Personalize your webpage and app in real time with data from your customer 360.
4 minute read
RudderStack’s Real-time Personalization App combines several of RudderStack’s API and integration features to make your customer 360 data available for personalization use cases. Instead of significant custom work, you can hand your website and app developers a ready-made endpoint with whatever customer 360 data your product or marketing team needs.
The Real-time Personalization App leverages three components:
Your customer 360 data set (generated through Profiles).
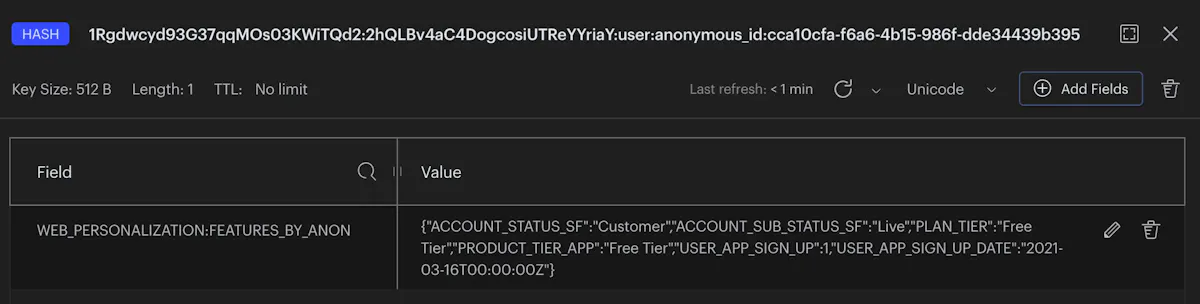
A Redis cache, where you push your customer 360 data.
RudderStack’s Activation API, which gives you real-time access to the data in your Redis cache.
Implement real-time personalization with RudderStack
Set up and run a Profiles project to generate the data you want to make available in real-time.
Turn on the Activation API and add your Redis credentials.
Integrate the API into your website or app.
Step 1: Build a Profiles project
If you aren’t already running Profiles, the first step is to create a new Profiles Project to resolve user identities, and build features that drive personalization logic and content.
Ensure that you have a feature view for the ID you will be using in your website or app (for example,user_name or anonymous_id)
Step 2: Turn on Activation API
Once the Profiles project has been run in the RudderStack UI, turn on the Activation API.
This will sync your data with your Redis cache.
Step 3: Integrate Activation API into website or app
Once you enable the Activation API, your frontend and mobile developers can integrate it into your websites and apps to deliver last-mile personalized experiences.
At a high level, the implementation consists of:
Accessing a unique identifier for the visitor or app user.
Sending that ID to the API endpoint, looking up the user, and returning additional available data.
Customizing the experience based on the features received from the endpoint.
Website personalization sample code
This section contains several code samples for implementing personalization on a website running Next.js.
Access and decrypt user’s unique identifier
For website personalization, to minimize delay, you can intercept the server request and then decrypt the anonymousId utilizing @rudderanalytics/analytics-js-cookies.
A sample code from a website built on Next.js:
import{NextRequest,NextResponse}from'next/server'import{RequestCookies,ResponseCookies}from'@edge-runtime/cookies'import{getDecryptedValue,anonymousUserIdKey}from'@rudderstack/analytics-js-cookies'exportdefaultasyncfunctionmiddleware(request:NextRequest){constheaders=newHeaders()constrequestCookies=newRequestCookies(request.headers)constanonCookie=requestCookies.get(anonymousUserIdKey)if(anonCookie?.value){constanonymousId=getDecryptedValue(anonCookie.value)// next step...
}returnNextResponse.next({headers})}
Make an async request to Activation API
Once you have the decrypted identifier, you can pass it to the Activation API endpoint to look up a user and pull down their data from Redis.
A sample code from a website built on Next.js:
exportdefaultasyncfunctionmiddleware(request:NextRequest){// previous code here
if(anonCookie?.value){constanonymousId=getDecryptedValue(anonCookie.value)constprofilesAPI='https://profiles.rudderstack.com/v1/activation'constprofilesRes=awaitfetch(profilesAPI,{method:'POST',body:JSON.stringify({entity:'user',destinationId:/* YOUR DESTINATION ID HERE */,id:{type:'anonymous_id',value:anonymousId}}),headers:{'Content-Type':'application/json','Authorization':`Bearer ${process.env.PROFILES_BEARER_TOKEN}`},cache:'no-cache'})// next step...
}returnNextResponse.next({headers})}
Set ResponseCookies with values required for personalization
Lastly, you can set a ResponseCookie with the values required for personalization.
A sample code from a website built on Next.js:
exportdefaultasyncfunctionmiddleware(request:NextRequest){// previous code here
if(anonCookie?.value){// previous code here
letuserAppSignUp=falseconst{data}:ProfilesResponseType=awaitprofilesRes.json()if(Object.keys(data).length!==0){const{USER_APP_SIGN_UP}=data['WEB_PERSONALIZATION:FEATURES_BY_ANON']if(USER_APP_SIGN_UP!==null&&Number(USER_APP_SIGN_UP)===1){userAppSignUp=true}}constsignupValue=Boolean(userAppSignUp).toString()constexpiryDate=newDate(Number(newDate())+cookieExpiry)responseCookies.set('rs_activation_signed_up',signupValue,{expires:expiryDate,secure:true,path:'/'})}returnNextResponse.next({headers})}
Access ResponseCookie
Once you’ve added a new ResponseCookie to the headers, you’re able to receive that on the frontend and use it to trigger the personalized experience.
A sample code from a website built on Next.js is shown below. Note that this example utilizes the universal-cookie library.
At this point, your developers can leverage the data to drive the logic (and content) of personalized experiences.
A sample code from a website built on Next.js is shown below. In this example, the code changes a button based on a user’s signup status.
import{getSignedUpFromCookie}from'~/utils/cookies'exportconstHeaderCTAButton=()=>{constsignedUp=getSignedUpFromCookie()constbuttonClass=signedUp?'signed-up':'default'constbuttonText=signedUp?'Request Demo':'Try for free'constbuttonURL=signedUp?'/request-demo':'/try-for-free'return(<aclassName={`button ${buttonClass}`}href={buttonURL}>{buttonText}</a>)}
Questions? We're here to help.
Join the RudderStack Slack community or email us for support
This site uses cookies to improve your experience while you navigate through the website. Out of
these
cookies, the cookies that are categorized as necessary are stored on your browser as they are as
essential
for the working of basic functionalities of the website. We also use third-party cookies that
help
us
analyze and understand how you use this website. These cookies will be stored in your browser
only
with
your
consent. You also have the option to opt-out of these cookies. But opting out of some of these
cookies
may
have an effect on your browsing experience.
Necessary
Always Enabled
Necessary cookies are absolutely essential for the website to function properly. This
category only includes cookies that ensures basic functionalities and security
features of the website. These cookies do not store any personal information.
This site uses cookies to improve your experience. If you want to
learn more about cookies and why we use them, visit our cookie
policy. We'll assume you're ok with this, but you can opt-out if you wish Cookie Settings.