Create a Profiles project using the Profile Builder (PB) tool.
7 minute read
Profile Builder (PB) is a command-line interface (CLI) tool that simplifies data transformation within your warehouse. It generates customer profiles by stitching data together from multiple sources.
This guide lists the detailed steps to install and use the Profile Builder (PB) tool to create, configure, and run a new project.
RudderStack supports Snowflake, Redshift, BigQuery, and Databricks warehouses for Profiles. You must grant certain warehouse permissions to let RudderStack read from schema having the source tables (for example, tracks and identifies tables generated via Event Stream sources), and write data in a new schema created for Profiles.
Create a warehouse connection to allow PB to access your data:
pb init connection
Then, follow the prompts to enter details about your warehouse connection.
A sample connection for a Snowflake account is as follows:
Enter Connection Name: test
Enter target:  (default:dev):  # Press enter, leaving it to default
Enter account: ina13147.us-east-1
Enter warehouse: rudder_warehouse
Enter dbname: your_rudderstack_db
Enter schema: rs_profiles # A segregated schema for storing tables/views created by Profiles
Enter user: profiles_test_user
Enter password: <password>
Enter role: profiles_role
Append to /Users/<user_name>/.pb/siteconfig.yaml? [y/N]
y
A sample connection for a Redshift account is as follows:
Using warehouse credentials
How would you like to connect with warehouse? [1] Using the warehouse credentials[Username, Password]
[2] Using access key security credentials values [AWS Access Key ID and Secret Access Key].
1
Please enter the following details for creating a new connection, that will enable pb to connect to your redshift account.
The created connections details will be stored in the file /Users/rudderstack/.pb/siteconfig.yaml
Enter Connection Name: test
Enter target:  (default:dev):  # Press enter, leaving it to default
Enter host: warehouseabc.us-west-1.redshift.amazonaws.com
Enter port: 5439
Enter dbname: your_rudderstack_db
Enter schema: rs_profiles # A segregated schema for storing tables/views created by Profiles
Enter user: profiles_test_user
Enter password: <password>
Enter sslmode: options - [disable require]: # Enter "require" in case your Redshift connection mandates sslmode.
Append to /Users/rudderstack/.pb/siteconfig.yaml? [y/N]
y
Using access key security credentials
How would you like to connect with warehouse? [1] Using the warehouse credentials[Username, Password]
[2] Using access key security credentials values [AWS Access Key ID and Secret Access Key].
2
Please enter the following details for creating a new connection, that will enable pb to connect to your redshift account.
The created connections details will be stored in the file /Users/rudderstack/.pb/siteconfig.yaml
Enter Connection Name: test
Enter target:  (default:dev):  # Press enter, leaving it to default
Enter host: warehouseabc.us-west-1.redshift.amazonaws.com
Enter dbname: your_rudderstack_db
Enter schema: rs_profiles # A segregated schema for storing tables/views created by Profiles
Enter user: profiles_test_user
Enter shared_profile: as
Append to /Users/rudderstack/.pb/siteconfig.yaml? [y/N]
y
To know more about host, log in to your AWS Console and go to Clusters.
A sample connection for a Databricks account is as follows:
Enter Connection Name: test
Enter target:  (default:dev):  # Press enter, leaving it to default
Enter host: a1.8.azuredatabricks.net # The hostname or URL of your Databricks cluster
Enter port: 443 # The port number used for establishing the connection. Usually it is 443 for https connections.
Enter http_endpoint: /sql/1.0/warehouses/919uasdn92h # The path or specific endpoint you wish to connect to.
Enter access_token: <password> # The access token created for authenticating the instance.
Enter user: profiles_test_user # Username of your Databricks account.
Enter schema: rs_profiles # A segregated schema for storing tables/views created by Profiles
Enter catalog: your_rudderstack_db # The database or catalog having data that you’ll be accessing.
Append to /Users/<user_name>/.pb/siteconfig.yaml? [y/N]
y
RudderStack currently supports Databricks on Azure. To get the Databricks connection details:
Log in to your Azure’s Databricks Web UI.
Click on SQL Warehouses on the left.
Select the warehouse to connect to.
Select the Connection Details tab.
A sample connection for a BigQuery account is as follows:
Enter Connection Name: test
Enter target:  (default:dev):  # Press enter, leaving it to default
Enter credentials: json file path: # File path of your BQ JSON file, for example, /Users/alexm/Downloads/big.json. Entering an incorrect path will exit the program.
Enter project_id: profiles121
Enter schema: rs_profiles
Append to /Users/<user_name>/.pb/siteconfig.yaml? [y/N]
y
This creates a site configuration file inside your home directory: ~/.pb/siteconfig.yaml. If you don’t see the file, enable the View hidden files option.
3: Create project
Run the following command to create a sample project:
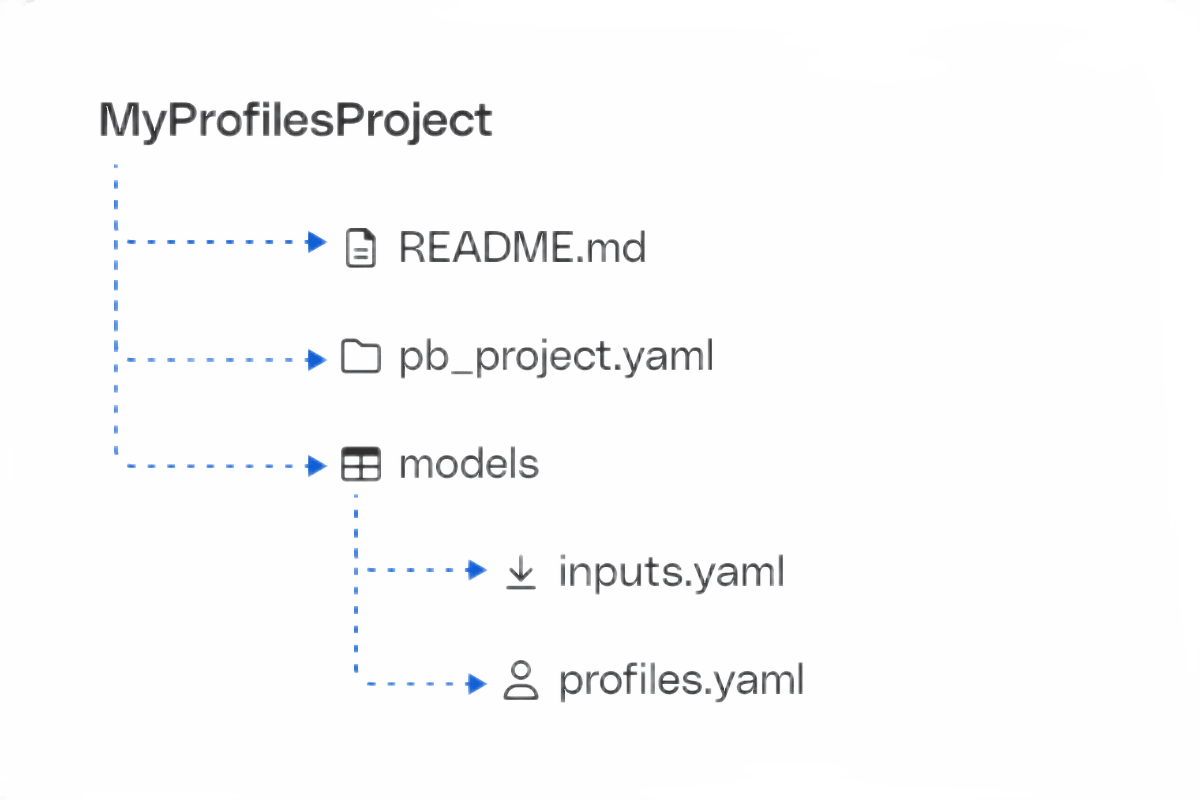
pb init pb-project -o MyProfilesProject
The above command creates a new project in the MyProfilesProject folder with the following structure:
You can run the pb show models command to get the exact name and path of the generated ID stitcher/feature table. See show command for more information.
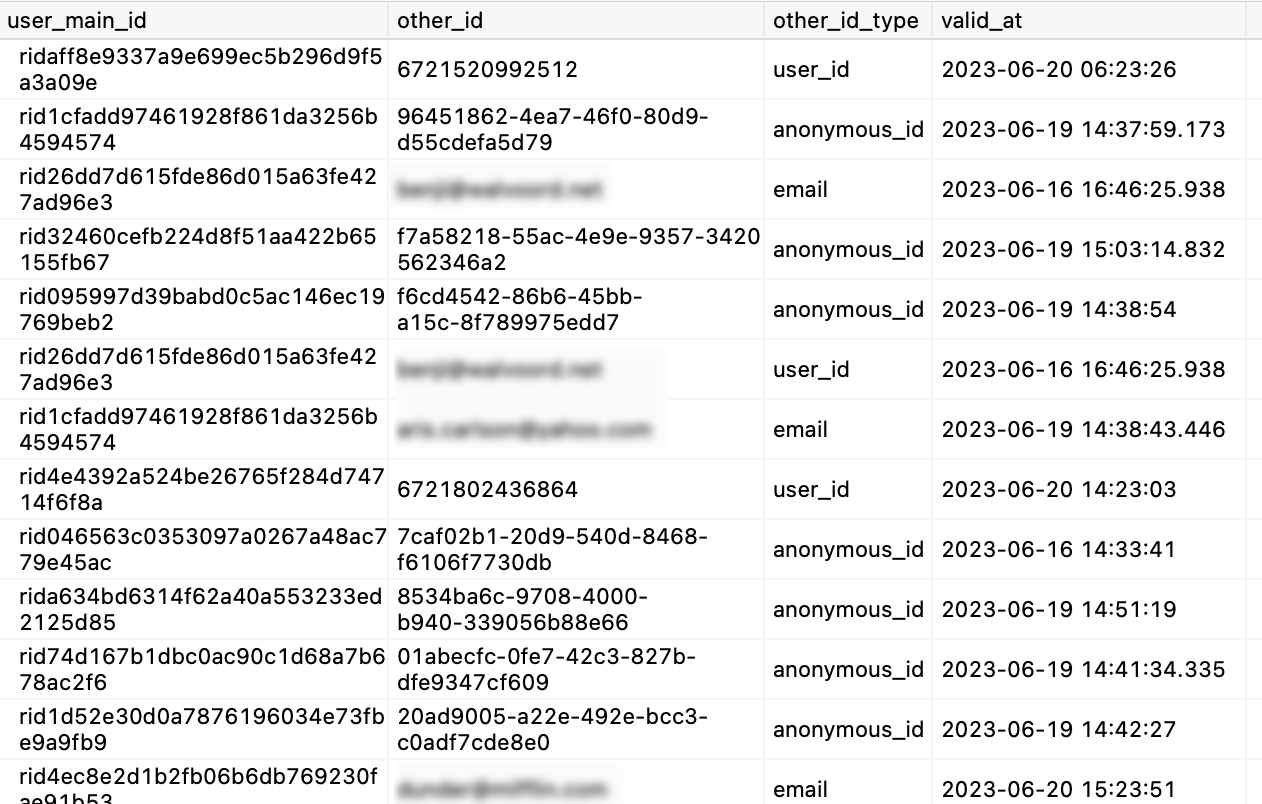
Then, execute the below query to view the generated tables in the warehouse:
select*from<table_name>limit10;
Here’s what the columns imply:
user_main_id: Rudder ID generated by Profile Builder. Think of a 1-to-many relationship, with one Rudder ID connected to different IDs belonging to same user such as User ID, Anonymous ID, Email, Phone number, etc.
other_id: ID in input source tables that is stitched to a Rudder ID.
other_id_type: Type of the other ID to be stitched (User ID, Anonymous ID, Email, etc).
valid_at: Date at which the corresponding ID value occurred in the source tables. For example, the date at which a customer was first browsing anonymously, or when they logged into the CRM with their email ID, etc.
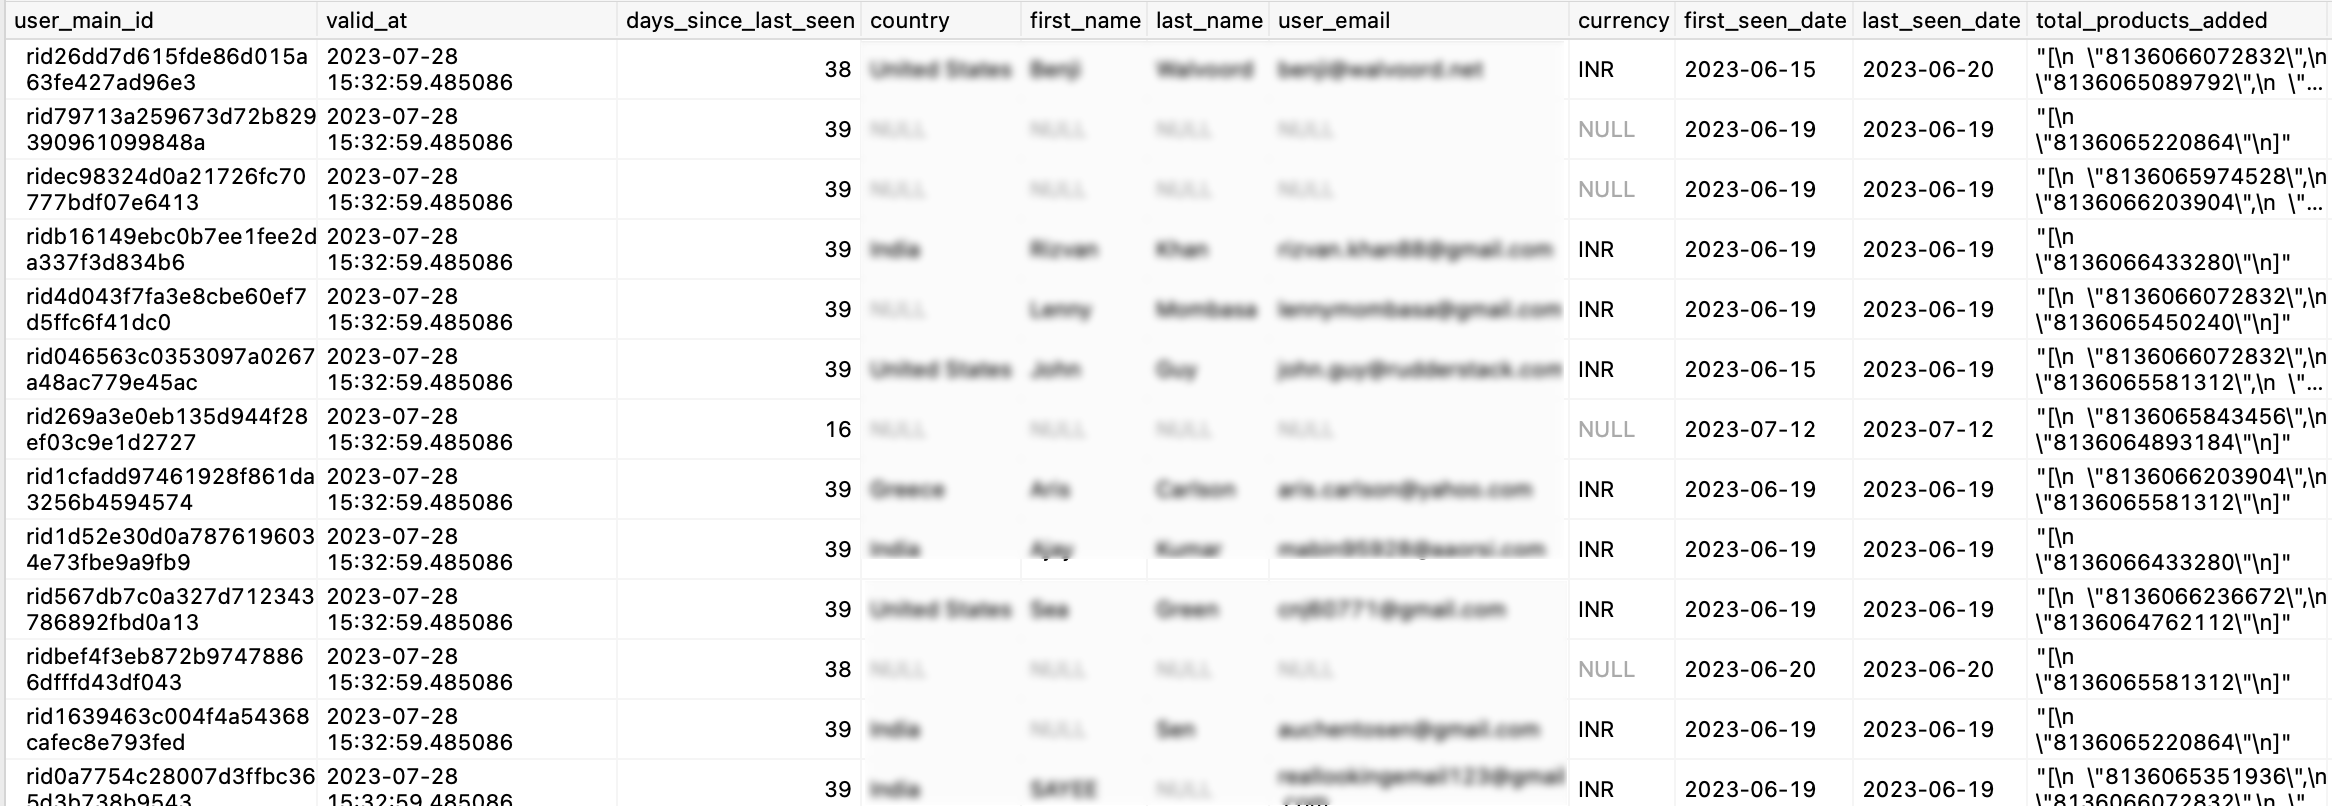
user_main_id: Rudder ID generated by Profile Builder.
valid_at: Date when the feature table entry was created for this record.
first_seen, last_seen, country, first_name, etc. - All features for which values are computed.
Migrate your existing project
To migrate an existing PB project to the schema version supported by your PB binary, navigate to your project’s folder. Then, run the following command to replace the contents of the existing folder with the new one:
pb migrate auto --inplace
A confirmation message appears on screen indicating that the migration is complete. A sample message for a user migrating their project from version 25 to 44:
2023-10-17T17:48:33.104+0530	INFO	migrate/migrate.go:161
Project migrated from version 25 to version 44
This site uses cookies to improve your experience while you navigate through the website. Out of
these
cookies, the cookies that are categorized as necessary are stored on your browser as they are as
essential
for the working of basic functionalities of the website. We also use third-party cookies that
help
us
analyze and understand how you use this website. These cookies will be stored in your browser
only
with
your
consent. You also have the option to opt-out of these cookies. But opting out of some of these
cookies
may
have an effect on your browsing experience.
Necessary
Always Enabled
Necessary cookies are absolutely essential for the website to function properly. This
category only includes cookies that ensures basic functionalities and security
features of the website. These cookies do not store any personal information.
This site uses cookies to improve your experience. If you want to
learn more about cookies and why we use them, visit our cookie
policy. We'll assume you're ok with this, but you can opt-out if you wish Cookie Settings.