Use Profiles’ predictive features to train machine learning models.
7 minute read
Predictions is part of our Early Access Program, where we work with early users and customers to test new features and get feedback before making them generally available. These features are functional but can change as we improve them. We recommend connecting with our team before running them in production.
Predictions extends Profiles’ standard feature development functionality and lets you easily create predictive features in your warehouse. You can predict features like:
Is a customer likely to churn in the next 30 days?
Will a user make a purchase in the next 7 days?
Is a lead going to convert?
How much is a user likely to spend in the next 90 days?
Finally, you can add the predicted feature to user profiles in your warehouse automatically and deliver ML-based segments and audiences to your marketing, product, and customer success teams.
The following self-guided tour shows you how to build the predictive traits. You can follow the guide and build the project yourself, including sample data, in our Predictions sample project.
Use cases
This section covers some common Predictions use cases.
Churn prediction
Predicting churn is one of the crucial initiatives across businesses. Without a predicted churn score, your actions are reactive, whereas you can act proactively with a user trait like is_likely_to_churn. Once you have such features, you can activate them with the appropriate outreach programs to prevent user churn.
Customer LTV prediction
Predictions helps you understand your customers’ purchasing behavior over time. You can predict how much amount a particular customer is likely to spend within the prediction time range.
Follow the Feature table guide to start with a basic Profiles project. The feature you want to predict should be a part of the feature table in the project.
For example, to predict 30-day inactive churn in advance, you should define it in the feature table so that the model knows how to compute this for historic users.
entity_var:name:churn_30_daysselect:case when days_since_last_seen >= 30 then 1 else 0 end
2. Training
RudderStack simplifies your training configuration to a set of parameters. Start with a python_model type and mention the following parameters:
Definition of the feature that needs to be defined only for a segment of users.
For example, country='US' and is_payer=true
config.data.inputs
Path to the referenced project. The inputs key above should have &inputs added to it.
entity_column
If the value ofid_column_name in the ID stitcher is changed, it should be referenced here too. This field is optional otherwise.
recall_to_precision_importance
Also referred to as beta in f-beta score, this field is used in classification models to fine-tune the model threshold and give more weight to recall against precision.
Note: This is an optional parameter. If not specified, it defaults to 1.0, giving equal weight to precision and recall.
ignore_features
List of columns from the feature table which the model ignores for training.
3. Prediction
In your python_model, mention the following parameters:
predict:inputs:- packages/feature_table/models/shopify_user_featuresconfig:data:*model_data_input_configsoutputs:column_names:percentile:&percentile_namepercentile_churn_score_7_daysscore:churn_score_7_daysfeature_meta_data:&feature_meta_datafeatures:- name:*percentile_namedescription:'Percentile of churn score. Higher the percentile, higher the probability of churn'
Parameter
Description
inputs Required
Path to the base features project.
percentile Required
Column in the output table having the percentile score.
score Required
Column in the output table having the probabilistic score.
description Required
Custom description to give for the feature.
4. Scheduling
Contact us to enable this feature for your account.
Upload your project to a GitHub repository.
Create a Profiles project in the RudderStack dashboard. Use the GitHub repository to set up the project.
Schedule your project with the required cadence. Note that this schedule is for prediction.
Trainings are scheduled as per your configuration of the file_validity parameter in the training section of your project.
LTV models
While the default labels in the churn prediction model are Boolean, Profiles also lets you predict a continuous variable like revenue or LTV. The configuration is almost similar to churn prediction with some minor adjustments.
Definition of the feature that needs to be defined only for a segment of users.
For example, country='US' and is_payer=true
config.data.inputs
Path to the referenced project. The inputs key above should have &inputs added to it.
entity_column
If the value ofid_column_name in the ID stitcher is changed, it should be referenced here too. This field is optional otherwise.
ignore_features
List of columns from the feature table which the model ignores for training.
Note that:
Unlike churn prediction, you should not specify the label_value and recall_to_precision_importance labels.
The LTV model introduces a new parameter called task which you must set to regression. Profiles assumes a classification model by default, unless explicitly specified otherwise.
Prediction
The python_model for the LTV use case remains almost the same as churn prediction, except some minor changes:
predict:inputs:- packages/feature_table/models/shopify_user_featuresconfig:data:*model_data_configspreprocessing:*model_prep_configsoutputs:column_names:percentile:&percentile_namepercentile_predicted_amount_spentscore:predicted_amount_spentfeature_meta_data:&feature_meta_datafeatures:- name:*percentile_namedescription:'Percentile of predicted future LTV. Higher the percentile, higher the expected LTV.'
Parameter
Description
inputs Required
Path to the base features project.
percentile Required
Column in the output table having the percentile score.
score Required
Column in the output table having the probabilistic score.
description Required
Custom description to give for the feature.
The label column is missing in the above predict block as the score parameter captures the actual prediction value and a Boolean flag is not meaningful in regression use cases.
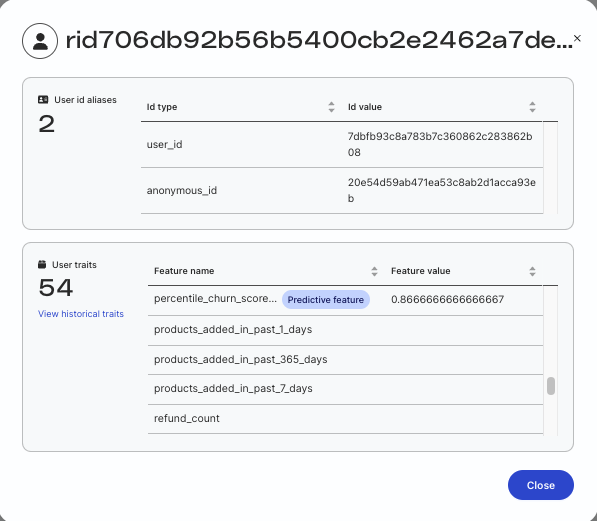
Final output or the predicted features are pushed to your customer360 table. Use the Explorer tab to check the predicted value for any given user along with the historical values up to last 5 runs.
To check the predicted value for a given user:
In the Preview section, go to the Predictive features tab.
Check the user profile for which the predictive feature has a value.
Search the USER_MAIN_ID of the profile in Profile viewer.
The value of the predictive feature is a probability. You can consider it as true or false based on your threshold.
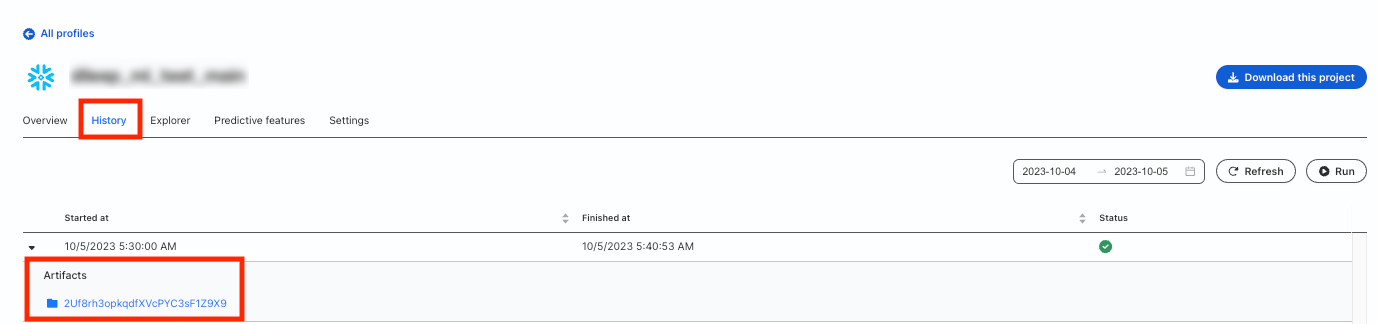
All your predictive features are listed separately in the Overview tab of your Profiles project. You can check the logs of each run in the artifacts directory (available in the History tab of your Profiles project).
This site uses cookies to improve your experience while you navigate through the website. Out of
these
cookies, the cookies that are categorized as necessary are stored on your browser as they are as
essential
for the working of basic functionalities of the website. We also use third-party cookies that
help
us
analyze and understand how you use this website. These cookies will be stored in your browser
only
with
your
consent. You also have the option to opt-out of these cookies. But opting out of some of these
cookies
may
have an effect on your browsing experience.
Necessary
Always Enabled
Necessary cookies are absolutely essential for the website to function properly. This
category only includes cookies that ensures basic functionalities and security
features of the website. These cookies do not store any personal information.
This site uses cookies to improve your experience. If you want to
learn more about cookies and why we use them, visit our cookie
policy. We'll assume you're ok with this, but you can opt-out if you wish Cookie Settings.