While automated features are incredibly useful for quickly deploying activity-based churn scores, data teams inevitably want to go deeper and define custom predictions that match their unique business logic and KPIs.
Basic customization is possible in the UI as we covered above, but Predictions also supports a code-based workflow that gives technical users full control and complete customizability, as well as the ability to integrate the process into their existing development workflow.
For example, if you are an eCommerce company, it can be helpful to predict whether or not a user will make a purchase over a certain dollar amount, over the next n days.
RudderStack makes it easy to migrate from the UI-based workflow to the code-based workflow to build these more complex use cases.
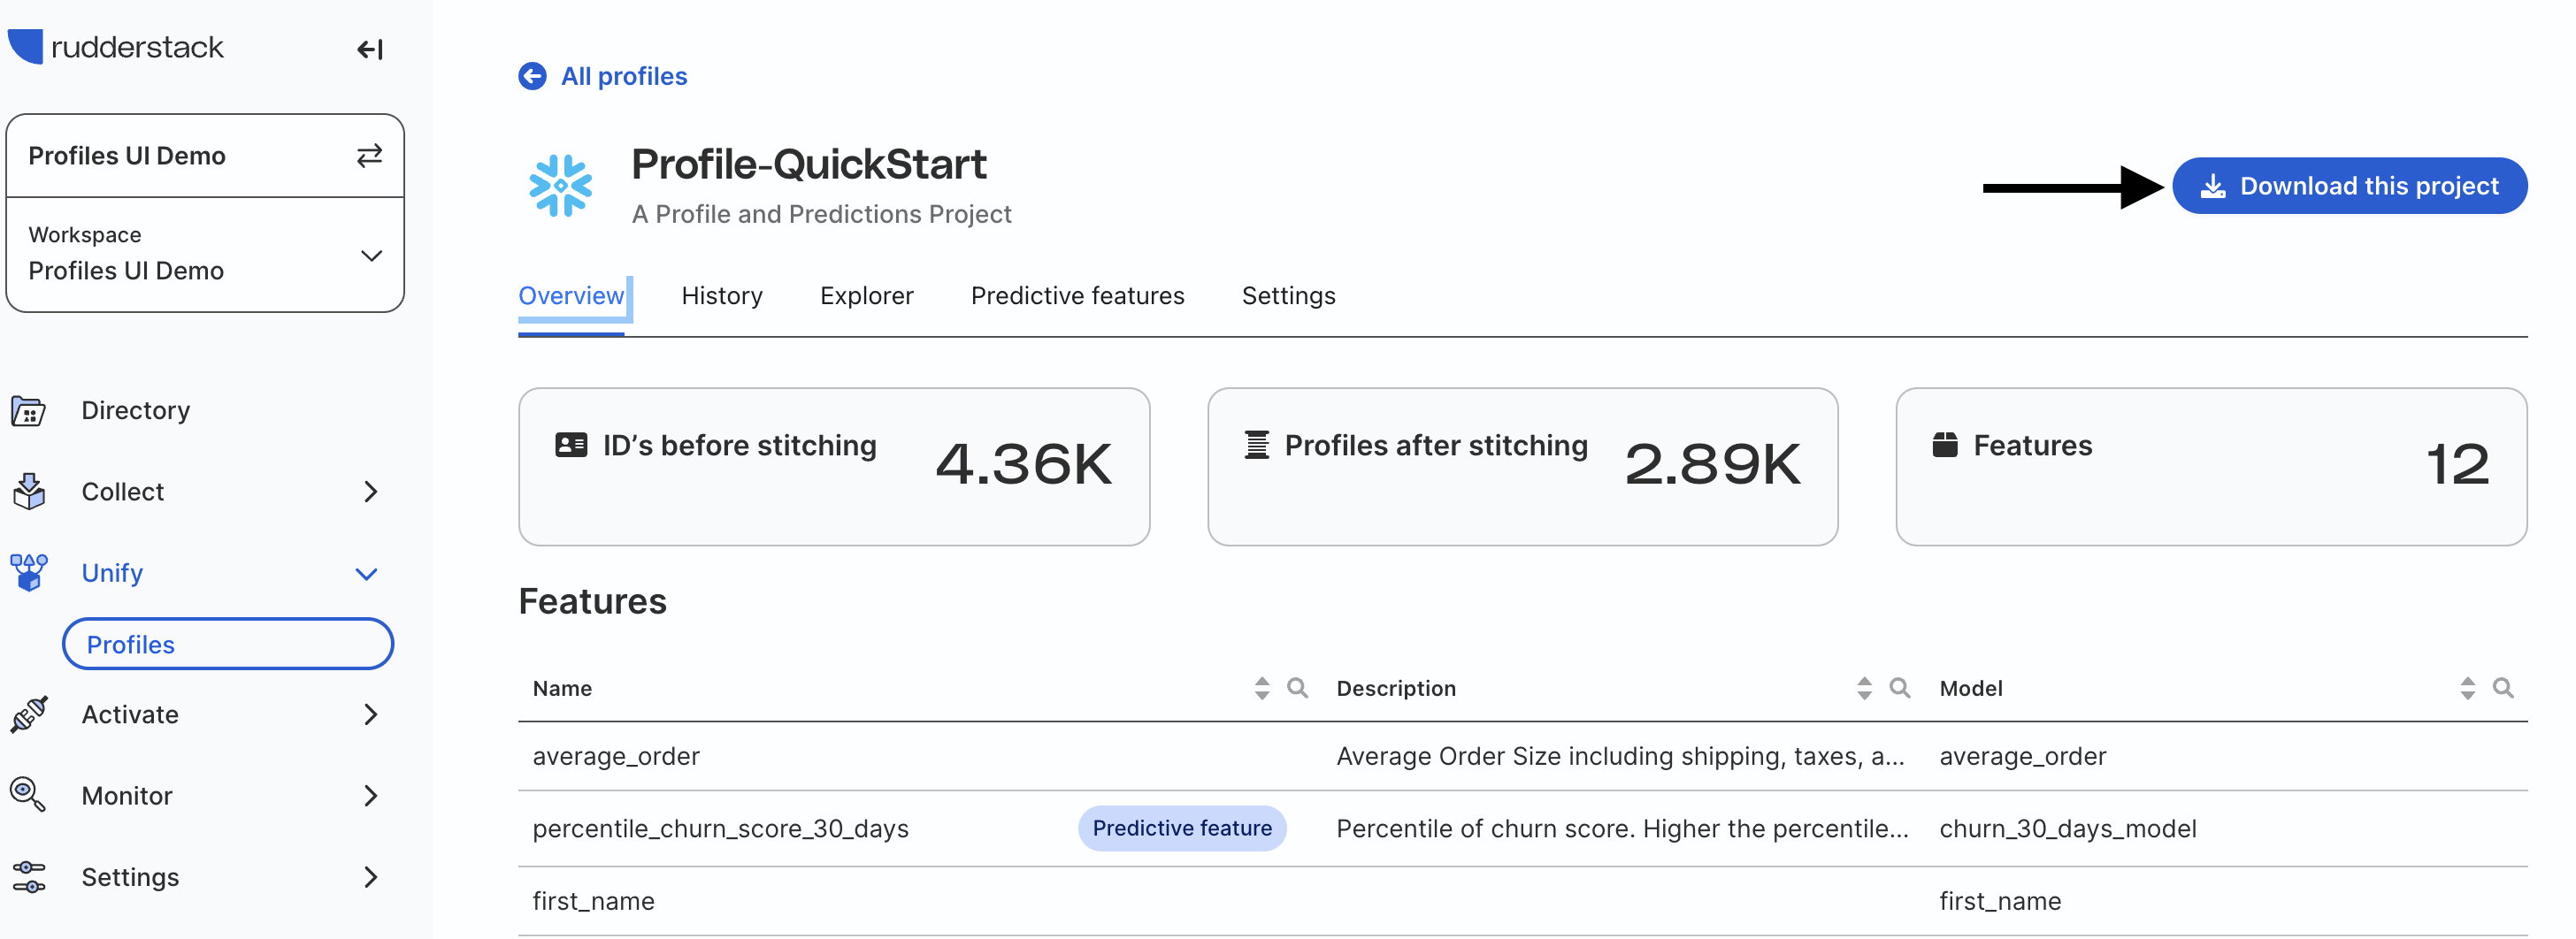
Download project files
On the Profiles screen, find your project and click the Download this Project button on the top right side. This will download all the files for that Profiles project in a compressed (zip) file including the modeling files.
Inside the Profiles folder you will find pb_project.yaml and a models folder with resources.yaml.
pb_project.yaml is the main configuration file for the Profiles project. The top section defines the name, schema_version, connection, and model_folder (where the files that define the details of the Profiles project can be found).
Update the following values:
name to Profile-Quickstart to match the name in the UI.
connection to QUICKSTART to match the database connection we made in the Prerequisites section.
name:Profile-QuickStartschema_version:49# Or most recent versionconnection:QUICKSTARTmodel_folders:- models
Below there is an entities section that defines the entities and the kinds of ID’s make up that entity. An entity is a business concept or unit that will be used to build the identity graph and features. Projects can contain multiple entities like user, household, and organization.
For this project, there is one entity called user with 5 different types of IDs. An ID type maps which ID fields can be joined together. For example, if you have two tables with user_id columns called id and userid, by giving each the type user_id Profiles knows to join those tables on those columns.
The ID fields are already mapped to these types in the UI. Nothing needs to be updated in this section.
Finally there is a packages section. This section allows you to import a Profiles project from GitHub and use the feature definitions from that project in this one. The imported project provides the definitions for the standard features selected in the UI. Nothing needs to be updated in this section.
packages:- name:base_featuresurl:https://github.com/rudderlabs/rudderstack-profiles-multieventstream-featuresinputsMap:# These are the tables automatically mapping in the UI (TRACKS, PAGES, IDENTIFIES)rsIdentifies_1:inputs/rsIdentifies_1rsIdentifies_2:nilrsIdentifies_3:nilrsPages_1:inputs/rsPages_1rsPages_2:nilrsPages_3:nilrsTracks_1:inputs/rsTracks_1rsTracks_2:nilrsTracks_3:niloverrides:# By default all features are imported from the project, therefore the features we did not select need to be disabled- requested_enable_status:disabledmodels:- entity/user/active_days_in_past_365_days- entity/user/active_days_in_past_7_days- entity/user/avg_session_length_in_sec_365_days- entity/user/avg_session_length_in_sec_last_week- entity/user/avg_session_length_in_sec_overall- entity/user/campaign_sources- entity/user/campaigns_list- models/churn_7_days_model- models/churn_90_days_model- entity/user/country- entity/user/currency- entity/user/days_since_account_creation- entity/user/days_since_last_seen- entity/user/first_campaign_name- entity/user/is_churned_7_days- entity/user/last_campaign_name- entity/user/last_source_name- entity/user/max_timestamp_bw_tracks_pages- entity/user/mediums_list- entity/user/sources_list- entity/user/total_sessions_365_days- entity/user/total_sessions_till_date
resource.yaml
resources.yaml contains two main sections: inputs and var_groups.
The inputs section defines what ID’s are in each table and their mapping. Currently these are all the tables and mappings that were defined in the UI. These tables are used for creating an identity graph and all features related to it.
If you want to add another table in the future, the table and ID mappings would be added here. Below is an example of the ORDER_COMPLETED table we manually mapped in the UI. It consists of the following fields:
Field
Description
name
alias for the table; the primary reference in the rest of the yaml files
table
<SCHEMA>.<TABLE_NAME>
select
column with ID
type
kind of ID
entity
what entity the ID should be mapped to
to_default_stitcher
true unless you decide to use a different ID stitcher
The var_groups section is where custom features are defined, both custom features created in the UI and those added via code in this file. Custom features are organized into groups by entity (in our case only user). The entity is like the group by variable in a SQL query.
Below that custom features are defined in the vars subsection. Here is the average_order feature we created in the UI.
- entity_var:is_feature:truename:average_orderdescription:Average Order Size including shipping, taxes, and discountsselect:AVG(TOTAL)from:inputs/rs_EVENTS_ORDER_COMPLETED
A name and description are required for the custom feature and then it is defined using declarative SQL syntax. This allows you to define the custom feature the same way you would if creating a new table with SQL.
Create a custom predictive feature
Just like in the UI workflow, you must already have defined the feature you want to predict. Therefore we are going to add a new custom feature for large purchases in the last 90 days. NOTE: Currently predictive features can only be binary (i.e. 1/0)
A large order is defined here as any order with a TOTAL of > $100.
At the bottom of the resources.yaml, add the name and definition for large_purchase_last_90.
- entity_var:name:large_purchase_last_90description:Customer that made a purchase of >$100 in the last 90 days.select:CASE WHEN MAX(TOTAL) > 100 THEN 1 ELSE 0 ENDfrom:inputs/re_EVENTS_ORDER_COMPLETEDwhere:DATEDIFF(days, TIMESTAMP, CURRENT_DATE) <= 90
You can use SQL functions and keywords in the definition. FOr example, a CASE statement in the SELECT statement and add a where statement and use the DATEDIFF function. You can also use the alias for the ORDER_COMPLETED table in the from statement.
For more details on Profiles and project file structure, you can review the Profiles documentation.
Organize the project in two files (OPTIONAL)
Profiles does not need specific yaml files in the models folder in order to run. That allows you to organize your code as you feel is best. You can keep it all in one file or can split it over multiple files.
You can split the resources.yaml file into inputs.yaml and profiles.yaml by creating the two yaml files. Then copy everything from the inputs section into inputs.yaml and var_groups into profiles.yaml.
Once done, you can delete the resources.yaml.
Add a custom predictive feature
This section explains how to create 2 new custom predictive features from large_purchase_last_90 called likelihood_large_purchase_90 (raw score) and percentile_large_purchase_90(percentile score).
Add Python ML requirement
In order to add custom predictive features, add the profiles-pycorelib package to the project requirements. At the bottom of pb_project.yaml add the following code to pb_project.yaml.
python_requirements:- profiles-pycorelib==0.2.1
Create ml_models.yaml
Now, create a new file and name it ml_models.yaml. This file is where you can define 2 new custom predictive features and how to train the ML model. The code for these new predictive features is discussed below.
This file is organized by the predictive model created for predictive features, not the individual features. The top level consists of:
Field/Section
Description
name
Name of the model (not feature)
model_type
python_model
model_spec
All of the model specifications
model_spec section:
Section
Description
train
Training configuration
predict
Scoring configuration
models:- name:&model_namelarge_purchase_90_modelmodel_type:python_modelmodel_spec:occurred_at_col:insert_tsentity_key:uservalidity_time:24hpy_repo_url:git@github.com:rudderlabs/rudderstack-profiles-classifier.git# Model training and scoring repotrain:file_extension:.jsonfile_validity:2160h# 90 days; when the model will be retrainedinputs:&inputs- packages/base_features/models/rudder_user_base_features# location of the base features created in the UI- packages/large_purchase_last_90# custom feature created in var_groups- models/average_order# custom feature we created in the UIconfig:data:&model_data_configpackage_name:feature_tablelabel_column:large_purchase_last_90# target featurelabel_value:1# target feature value predictingprediction_horizon_days:90# how far into the futurefeatures_profiles_model:'rudder_user_base_features'#taken from inputsoutput_profiles_ml_model:*model_nameeligible_users:'large_purchase_last_90 is not null'# limit training data to those with non-null valuesinputs:*inputspreprocessing:&model_prep_configignore_features:[first_name, last_name, state]# features we do not used in a modelpredict:inputs:*inputs# copy from trainconfig:data:*model_data_config# copy from trainpreprocessing:*model_prep_config# copy from trainoutputs:column_names:percentile:&percentilepercentile_large_purchase_90# name of percentile featurescore:&raw_scorelikelihood_large_purchase_90# name of raw likelihood featurefeature_meta_data:&feature_meta_datafeatures:- name:*percentiledescription:'Percentile of likelihood score. Higher the score the more likely to make a larger purchase'- name:*raw_scoredescription:'Raw likelihood score. Higher the score the more likely to make a larger purchase'<<:*feature_meta_data
Compile and run
Save all files. Now compile the project, this will make sure all SQL and python files are able to be created.
pb compile
Finally, run the project. This will generate the same files as compile and then execute them in Snowflake. The first run can take at least 30 minutes because of training ML models.
pb run
Final table
The final predictive features can be found in your Snowflake environment together in the same table. The table will provide you with the unified user ID, created by RudderStack, when the features are valid as of (i.e. when the model was last run to create these features), and model ID, and your predictive features.
This site uses cookies to improve your experience while you navigate through the website. Out of
these
cookies, the cookies that are categorized as necessary are stored on your browser as they are as
essential
for the working of basic functionalities of the website. We also use third-party cookies that
help
us
analyze and understand how you use this website. These cookies will be stored in your browser
only
with
your
consent. You also have the option to opt-out of these cookies. But opting out of some of these
cookies
may
have an effect on your browsing experience.
Necessary
Always Enabled
Necessary cookies are absolutely essential for the website to function properly. This
category only includes cookies that ensures basic functionalities and security
features of the website. These cookies do not store any personal information.
This site uses cookies to improve your experience. If you want to
learn more about cookies and why we use them, visit our cookie
policy. We'll assume you're ok with this, but you can opt-out if you wish Cookie Settings.