HTTP API
11 minute read
This guide provides a complete reference for the RudderStack HTTP API.
Overview
RudderStack offers an easy-to-use HTTP API that you can use to send your events programmatically. The API is fully Segment-compatible and is helpful in cases where you cannot use the SDKs.
RudderStack recommends using the RudderStack SDKs for tracking and routing user events from your sources. The SDKs offer automatic tagging of user context, event batching, and a retry functionality during delivery failure.
To use the HTTP API, configure an HTTP source in the dashboard, then send POST requests to your data plane URL via the v1/<event_type> endpoints.
If the client cannot sendPOSTrequests (for example, HTML/CSS-only UIs), use the Pixel API with the same HTTP source write key instead.
Prerequisites
- The RudderStack HTTP server must be accessible from your HTTP client
- Set up a source and connect it to a destination in your RudderStack dashboard
- Note your source write key to authenticate API requests

- Download (Right click > Save Link As) and import the Postman collection in this URL. Then, edit the variables
source_write_keyanddata_plane_urlwith your write key and data plane URL
Authorization
RudderStack uses Basic Authentication for authenticating all HTTP requests.
If you’re using Postman, authenticate the API by including an empty string ("") as the username and your source write key as the password in the Authorization tab.
To send events via the RudderStack HTTP API, set the Content-Type header toapplication/json.
Base URL
Use the data plane URLThe data plane URL is the location where events are routed and sent to the RudderStack backend for processing. You can find this URL at the top of the Connections page in your RudderStack dashboard. as the base URL for your API requests.
Identify
The identify call lets you associate a visiting user to their actions and record any associated traits.
Sample payload
{
  "userId": "identified user id",
  "anonymousId":"anon-id-new",
  "context": {
    "traits": {
       "trait1": "new-val"
    },
    "ip": "14.5.67.21",
    "library": {
        "name": "http"
    }
  },
  "timestamp": "2020-02-02T00:23:09.544Z"
}
Usage
curl -u <source_write_key>: -X POST <data_plane_url>/v1/identify \
-d @identify.json \
--header "Content-Type: application/json" http -a <source_write_key>: <DATA_PLANE_URL>/v1/identify < identify.jsonAccepted fields
userId or anonymousId is required.anonymousId is not presentyyyy-MM-ddTHH:mm:ss.SSSZ. For example: 2022-02-01T19:14:18.381Znameor emailTrack
The track call lets you track user actions along with any properties associated with them.
Sample payload
{
  "userId": "identified user id",
  "anonymousId":"anon-id-new",
  "event": "Product Purchased new",
  "properties": {
    "name": "Shirt",
    "revenue": 4.99
  },
  "traits": {
    "email": "alex@example.com"
  },
  "context": {
    "ip": "14.5.67.21",
    "library": {
        "name": "http"
    }
  },
  "timestamp": "2020-02-02T00:23:09.544Z"
}
Usage
curl -u <source_write_key>: -X POST <data_plane_url>/v1/track \
-d @track.json \
--header "Content-Type: application/json" http -a <source_write_key>: <DATA_PLANE_URL>/v1/track < track.jsonAccepted fields
userId or anonymousId is required.anonymousId is not present- The client-side SDKs automatically add this object persisted from the
identifyevent. - Any traits specified in the
trackevent will override the existing traits persisted from theidentifyevent. - The override will be applicable only for the particular
trackevent where thetraitsobject is specified explicitly. For future events, the user traits persisted from theidentifyevent are used.
yyyy-MM-ddTHH:mm:ss.SSSZ. For example: 2022-02-01T19:14:18.381ZPage
The page call lets you record your website’s page views with any additional relevant information about the viewed page.
Sample payload
{
  "userId": "identified user id",
  "anonymousId":"anon-id-new",
  "name": "Page View",
  "properties": {
    "title": "Home",
    "path": "/"
  },
  "context": {
    "ip": "14.5.67.21",
    "library": {
        "name": "http"
    }
  },
  "timestamp": "2020-02-02T00:23:09.544Z"
}
Usage
curl -u <source_write_key>: -X POST <data_plane_url>/v1/page \
-d @page.json \
--header "Content-Type: application/json" http -a <your_write_key>: <DATA_PLANE_URL>/v1/page < page.jsonAccepted fields
userId or anonymousId is required.anonymousId is not presentyyyy-MM-ddTHH:mm:ss.SSSZ. For example: 2022-02-01T19:14:18.381ZScreen
The screen call is the mobile equivalent of the page call. It lets you record whenever your user views their mobile screen with any additional relevant information about the screen.
Sample payload
{
  "userId": "identified user id",
  "anonymousId":"anon-id-new",
  "name": "Screen View",
  "properties": {
    "prop1": "5"
  },
  "context": {
    "ip": "14.5.67.21",
    "library": {
        "name": "http"
    }
  },
  "timestamp": "2020-02-02T00:23:09.544Z"
}
Usage
curl -u <source_write_key>: -X POST <data_plane_url>/v1/screen \
-d @screen.json \
--header "Content-Type: application/json" http -a <source_write_key>: <DATA_PLANE_URL>/v1/screen < screen.jsonAccepted fields
userId or anonymousId is required.anonymousId is not presenturl and referrer.yyyy-MM-ddTHH:mm:ss.SSSZ. For example: 2022-02-01T19:14:18.381ZGroup
The group call lets you link an identified user with a group such as a company, organization, or an account. It also lets you record any custom traits associated with that group, like the name of the company, the number of employees, etc.
Sample payload
{
  "userId": "user123",
  "groupId": "group1",
  "traits": {
    "name": "Company",
    "industry": "Industry",
    "employees": 123
  },
  "context": {
    "traits": {
       "trait1": "new-val"
    },
    "ip": "14.5.67.21",
    "library": {
        "name": "http"
    }
  },
  "timestamp": "2020-01-21T00:21:34.208Z"
}
Usage
curl -u <source_write_key>: -X POST <data_plane_url>/v1/group \
-d @group.json \
--header "Content-Type: application/json" http -a <source_write_key>: <DATA_PLANE_URL>/v1/group < group.jsonAccepted fields
userId or anonymousId is required.anonymousId is not presentnameor emailyyyy-MM-ddTHH:mm:ss.SSSZ. For example: 2022-02-01T19:14:18.381ZAlias
The alias call lets you merge different identities of a known user.
aliasis an advanced method that lets you change the tracked user’s ID explicitly. This method is useful when managing identities for some of the downstream destinations.
Sample payload
{
  "userId": "user123",
  "previousId": "previd1",
  "context": {
    "traits": {
       "trait1": "new-val"
    },
    "ip": "14.5.67.21",
    "library": {
        "name": "http"
    }
  },
  "timestamp": "2020-01-21T00:21:34.208Z"
}
Usage
curl -u <source_write_key>: -X POST <data_plane_url>/v1/alias \
-d @alias.json \
--header "Content-Type: application/json" http -a <source_write_key>: <DATA_PLANE_URL>/v1/alias < alias.jsonAccepted fields
anonymousId is not presentnameor emailyyyy-MM-ddTHH:mm:ss.SSSZ. For example: 2022-02-01T19:14:18.381ZBatch
The batch call allows you to send a series of identify, track, page, group and screen requests in a single batch. This call helps you minimize the number of outbound requests, thus enabling better performance.
RudderStack sets a maximum limit of4 MBper batch request and32 KBper call.
Sample payload
{
    "batch": [{
            "userId": "identified user id",
            "anonymousId": "anon-id-new",
            "type": "identify",
            "context": {
                "traits": {
                    "trait1": "new-val"
                },
                "ip": "14.5.67.21",
                "library": {
                    "name": "http"
                }
            },
            "timestamp": "2020-02-02T00:23:09.544Z"
        },
        {
            "userId": "identified user id",
            "anonymousId": "anon-id-new",
            "event": "Product Purchased new",
            "type": "track",
            "properties": {
                "name": "Shirt",
                "revenue": 4.99
            },
            "context": {
                "ip": "14.5.67.21",
                "library": {
                    "name": "http"
                }
            },
            "timestamp": "2020-02-02T00:23:09.544Z"
        },
        {
            "userId": "identified user id",
            "anonymousId": "anon-id-new",
            "name": "Page View",
            "type": "page",
            "properties": {
                "title": "Home",
                "path": "/"
            },
            "context": {
                "ip": "14.5.67.21",
                "library": {
                    "name": "http"
                }
            },
            "timestamp": "2020-02-02T00:23:09.544Z"
        },
        {
            "userId": "identified user id",
            "anonymousId": "anon-id-new",
            "name": "Screen View",
            "type": "screen",
            "properties": {
                "prop1": "5"
            },
            "context": {
                "ip": "14.5.67.21",
                "library": {
                    "name": "http"
                }
            },
            "timestamp": "2020-02-02T00:23:09.544Z"
        },
        {
            "userId": "user123",
            "type": "group",
            "groupId": "group1",
            "traits": {
                "name": "Company",
                "industry": "Industry",
                "employees": 123
            },
            "context": {
                "traits": {
                    "trait1": "new-val"
                },
                "ip": "14.5.67.21",
                "library": {
                    "name": "http"
                }
            },
            "timestamp": "2020-01-21T00:21:34.208Z"
        },
        {
            "userId": "user123",
            "previousId": "previd1",
            "type":"alias",
            "context": {
                "traits": {
                    "trait1": "new-val"
                },
                "ip": "14.5.67.21",
                "library": {
                    "name": "http"
                }
            },
            "timestamp": "2020-01-21T00:21:34.208Z"
        }

    ]
}
Usage
curl -u <source_write_key>: -X POST <data_plane_url>/v1/batch \
-d @batch.json \
--header "Content-Type: application/json" http -a <source_write_key>: <DATA_PLANE_URL>/v1/batch < batch.jsonAccepted fields
identify, track, page, group and screen calls. Each call must have a type property and a valid method name.HTTP responses
| Status code | Description |
|---|---|
200 | Successful API request |
400 | Bad request — possible reasons include:
|
401 | Missing or invalid authorization header
|
404 | Source or destination is disabled |
413 | Request body is too large |
429 | Too many requests |
500 | Internal server error |
Maximum allowed request size
RudderStack allows messages with a maximum size of 32 KB per call. The batch endpoint accepts a maximum call size of 4 MB per batch, and 32 KB per call. RudderStack responds with a 400 Bad Request error if these limits are exceeded.
Maximum allowed JSON nesting depth
RudderStack accepts event JSON payloads with a maximum nesting depth of 200 levels. Events that exceed this limit are rejected during ingestion with error feedback returned to the sender.
The following example highlights how JSON nesting depth is calculated. Both objects and arrays count toward the nesting depth:
{
  "a": [
    {
      "b": {
        "c": "This JSON has a nesting depth of 4"
      }
    }
  ]
}
In this example, the array a is at depth 1, the object inside the array is at depth 2, the object b is at depth 3, and the field c is at depth 4.
Event ordering
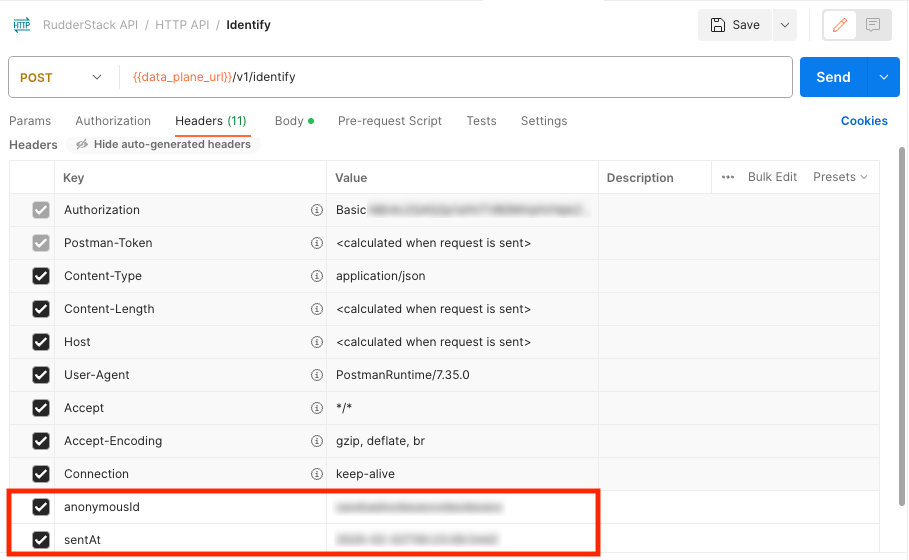
To maintain event ordering while using the HTTP API, make sure to include sentAt and anonymousId as a header in every request.
Historical imports
RudderStack lets you import any historical data by simply adding the timestamp argument to any of your API calls. However, this can be done only for the destinations that accept historical time-stamped data, like Amplitude, Mixpanel, etc.
If you are tracking current events, leave out thetimestampfield. RudderStack will automatically add the timestamps to the event requests.
