Cordova SDK
10 minute read
The RudderStack Cordova SDK lets you track event data from your Apache Cordova applications and send it to your specified destinations via RudderStack.
Refer to the GitHub codebase and the sample implementation to get a more hands-on understanding of the SDK.
SDK setup requirements
- Sign up for RudderStack.
- Set up a Cordova source in the dashboard. Note the write keyThe write key (or source write key) is a unique identifier for your source. RudderStack uses this key to send events from a source to the specified destination. for this source.
- You will also need the data plane URL associated with your RudderStack workspace.
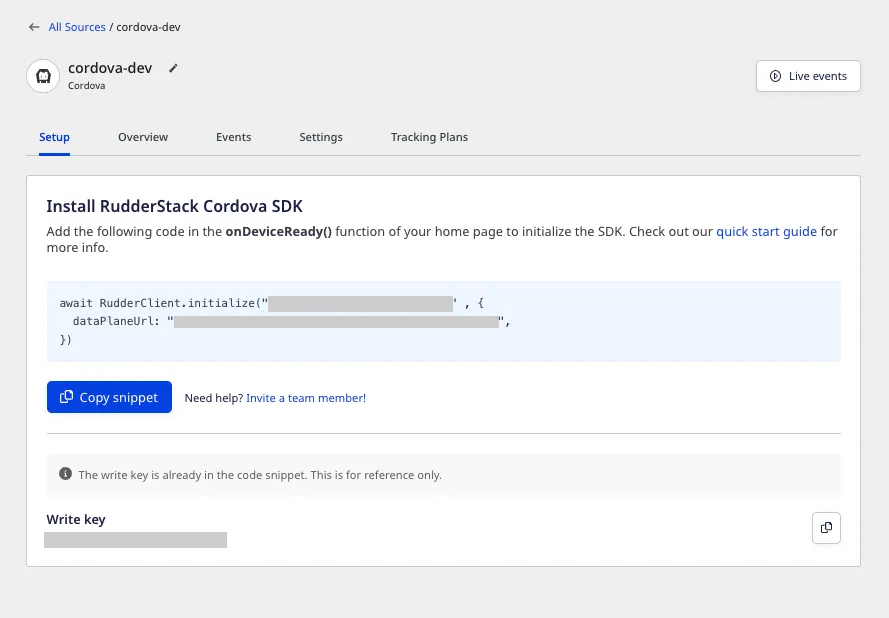
In the dashboard, the Setup tab for the source has an SDK installation snippet containing both the write key and the data plane URL. You can use it to integrate the Cordova SDK into your project.
Installing the Cordova SDK
To add the Cordova SDK as a dependency, navigate to the root folder of your application and run the following command:
cordova plugin add rudder-sdk-cordovaThe Cordova SDK supports device mode starting from version1.3.0.
Initializing the RudderStack client
After adding the SDK as a dependency, you need to set up the SDK.
Add the following code in the onDeviceReady() function of your home page to initialize the SDK.
A sample Cordova SDK initialization is as shown:
RudderClient.initialize(WRITE_KEY , {
  dataPlaneUrl: DATA_PLANE_URL,
  loglevel: RudderClient.LogLevel.VERBOSE,
})
Make sure you use theawaitkeyword with theinitializecall.
The setup method has the following signature:
| Name | Data Type | Presence | Description |
|---|---|---|---|
writeKey | string | Required | Your Cordova source writeKey from the dashboard. |
configuration | JSON Object | Optional | Contains the RudderStack client configuration. |
options | JSON Object | Optional | Extra options to be pass along with the event. |
- Check the Configuring the RudderStack Client section below for detailed information on the parameters you can send in the
configurationobject.- Check the Configuring the options object section below for detailed information on the parameters you can send in the
optionsobject.
Configuring the RudderStack client
You can configure your RudderStack client by passing the following parameters in the configuration object of your RudderClient.initialize() call:
| Parameter | Type | Description | Default Value |
|---|---|---|---|
logLevel | RudderClient.LogLevel | Controls how much of the log you want to see from the Cordova SDK. | RudderClient.LogLevel.None |
dataPlaneUrl | String | Your RudderStack data plane URLThe data plane URL is the location where events are routed and sent to the RudderStack backend for processing. You can find this URL at the top of the Connections page in your RudderStack dashboard. | - |
flushQueueSize | Integer | The number of events included in a batch request to the server. | 30 |
dbCountThreshold | Integer | The number of events to be saved in the SQLite database. Once the limit is reached, older events are deleted from the database. | 10000 |
sleepTimeout | Integer | Minimum waiting time to flush the events to the server. | 10 seconds |
configRefreshInterval | Integer | RudderStack fetches the config after this time interval. | 2 |
autoCollectAdvertId | Boolean | Determines if the SDK should automatically collect the advertisement ID on Android platforms. | false |
trackLifecycleEvents | Boolean | Determines if the SDK should capture the application lifecycle events automatically. | true |
Identify
The identify call lets you identify a visiting user and associate them with their actions. It also lets you record the traits about them like their name, email address, etc.
As a best practice, we recommend callingidentifyat the start of every session or page load for logged-in users. This will ensure allir latest traits are captured in all subsequent events.
A sample identify call is as shown below:
RudderClient.identify("userId", {
  address: {
    city: "LA",
    country: "USA",
    state: "CA",
  },
  birthday: "1984/07/17",
  company: {
    name: "RudderStack",
    id: "RS",
    industry: "IT",
  },
  email: "john@rudderstack.com",
  firstName: "john",
});
The identify method has the following signatures:
| Name | Data Type | Presence | Description |
|---|---|---|---|
userId | string | Required | User identifier in your database. |
traits | JSON Object | Optional | Information related to the user traits. |
options | JSON Object | Optional | Extra options for the identify event. |
Track
The track call lets you record the user actions along with their associated properties. Each user action is called an event.
A sample track event called Order Completed using the Cordova SDK is shown below:
RudderClient.track('Order Completed', {
  checkout_id: '18310159091413-2',
  order_id: '1153390412189-01',
  affiliation: 'Google Play Store',
  total: 68.00,
  subtotal: 60.00,
  revenue: 70.00,
  shipping: 5,
  tax: 3,
  discount: 10,
  coupon: 'NEWUSER',
  currency: 'USD',
  products: [{
      product_id: '853913-410121910',
      sku: 'FF-21',
      name: 'Varsity Graphic T-Shirt',
      price: 25,
      quantity: 1,
      category: 'Clothing',
      url: 'https://www.myntra.com/tshirts/huetrap/huetrap-men-beige/111/buy',
    },
    {
      product_id: '113413-190158920',
      sku: 'GF-67',
      name: 'Printed Round Neck T-Shirt',
      price: 15,
      quantity: 3,
      category: 'Clothing'
    }
  ]
})
The track method has the following signature:
| Name | Data Type | Presence | Description |
|---|---|---|---|
name | String | Required | Contains the name of the event that you want to track. |
properties | JSON Object | Optional | Contains the extra properties to be sent along with the event. |
options | JSON Object | Optional | Contains the extra event options. |
RudderStack automatically tracks the following application lifecycle events:
You can disable tracking these events by setting
trackLifecycleEventstofalsewhile initializing the SDK. However, it is highly recommended to keep it enabled.
Group
The group call lets you associate an identified user to a group - either a company, project, or a team, and record any custom traits or properties associated with that group.
A sample group call is as shown:
RudderClient.group("group1", {
  groupname: "RS",
  groupwork: "Mobile dev"
})
The group method has the following signatures:
| Name | Data Type | Presence | Description |
|---|---|---|---|
groupId | string | Required | The organization ID with which you want to associate the user. |
groupTraits | JSON Object | Optional | Any other property of the organization that you want to pass along with the call. |
options | JSON Object | Optional | Extra options for the group event. |
Screen
The screen call lets you record whenever your user views their mobile screen with any additional relevant information about the viewed screen.
A sample screen call is shown below:
RudderClient.screen("Home Screen", {
  mobile: "pixel"
})
The screen method has the following signature:
| Name | Data Type | Presence | Description |
|---|---|---|---|
screenName | string | Required | Name of the viewed screen. |
property | JSON Object | Optional | Extra properties that you want to pass along with the screen call. |
options | JSON Object | Optional | Extra options to be passed along with screen event. |
Alias
The alias call lets you merge different identities of a known user.
aliasis an advanced method that lets you change the tracked user’s ID explicitly. This method is useful when managing identities for some of the downstream destinations.
A sample alias call is shown below:
RudderClient.alias("userId")The alias method has the following signature:
| Name | Data Type | Presence | Description |
|---|---|---|---|
newId | String | Required | The new userId that you want to assign to the user. |
options | JSON Object | Optional | Event level options. |
For a detailed explanation of the alias call, refer to the RudderStack API Specification.
Reset
You can use the reset method to clear the persisted traits from the identify call. We recommend calling it during the Logout operation.
A sample reset call is as shown:
RudderClient.reset()Configuring the options object
The options object can be sent along with all above-mentioned API calls. It has the following signature:
| Name | Data Type | Presence | Description |
|---|---|---|---|
externalIds | JSON Object | Optional | Each key within externalIds object should define the type of external ID, and its value should be a String or Integer. |
integrations | JSON Object | Optional | Each key within the integrations object should hold the display name of your desired destination. Its value should be a boolean indicating whether you want to send that event or not. For more details check the Enabling/disabling events for specific destinations section below. |
A sample options object for an identify event is as shown:
RudderClient.identify("1hKOmRA4el9Ztm", {
  "address": {
    "city": "New Orleans",
    "country": "USA",
    "state": "Louisiana",
  },
  "birthday": "01/24/1984",
  "company": {
    "name": "Apple Inc.",
    "id": "1hKOmRA4el9Ztm",
    "industry": "IT"
  },
  "email": "alex@example.com",
  "firstName": "Alex",
}, {
  "externalIds": {
    "brazeExternalId": "externalId1"
  },
  "integrations": {
    "MixPanel": false,
    "Amplitude": true
  }
})
In the above snippet, the options object is as follows:
{
  "externalIds": {
    "brazeExternalId": "externalId1"
  },
  "integrations": {
    "MixPanel": false,
    "Amplitude": true
  }
}
Enabling/disabling user tracking via the optOut API (GDPR support)
RudderStack gives the users (e.g., an EU user) the ability to opt out of tracking any user activity until the user gives their consent. You can do this by leveraging RudderStack’s optOut API.
The optOut API takes true or false as a Boolean value to enable or disable tracking user activities. This flag persists across the device reboots.
The following snippet highlights the use of the optOut API to disable user tracking:
RudderClient.optOut(true);Once the user grants their consent, you can enable user tracking once again by using the optOut API with false as a parameter sent to it:
RudderClient.optOut(false);TheoptOutAPI is available in the Cordova SDK starting from version1.0.1.
Filtering events
When sending events to a destination via device mode, you can explicitly specify which events should be discarded or allowed to flow through - by allowlisting or denylisting them.
Refer to the Client-side Event Filtering guide for more information on this feature.
Enabling/disabling events for specific destinations
RudderStack lets you send your event data only to the explicitly specified destinations and filtering out the rest. You can do this in one of the following two ways:
- While initializing the Cordova SDK
- While making the event calls
Passing destinations during SDK initialization
This approach is useful when you want to send the events to specific destinations across all event calls made using the SDK.
A sample SDK initialization is shown below:
RudderClient.initialize("1n0JdVPZTRUIkLXYccrWzZwdGSx", {
  dataPlaneUrl: "https://0ff6-175-101-36-4.ngrok.io",
  flushQueueSize: 30,
  dbCountThreshold: 10000,
  configRefreshInterval: 2,
  logLevel: 0,
  sleepTimeOut: 10,
  trackLifecycleEvents: true,
  recordScreenViews: true,
}, {
  integrations: {
    Mixpanel: true,
    Amplitude: true
  }
})
Passing destinations during event calls
This approach is useful when you want to send particular events to specific destinations, or if you want to override the destinations specified during the SDK initialization for a particular event.
An example is shown below:
RudderClient.screen("Home Screen", {
  mobile: "pixel"
}, {
  integrations: {
    All: false,
    Salesforce: true
  }
})
In the above example, the values of the screen call are passed only to the Salesforce destination.
Anonymous ID
RudderStack uses the deviceId as anonymousId by default. You can use the putAnonymousId method to override the default anonymousId:
RudderClient.putAnonymousId("CustomAnonymousId");Setting the advertisement ID
RudderStack collects the advertisement ID only if autoCollectAdvertId is set to true during the SDK initialization:
RudderClient.initialize(WRITE_KEY , {
  dataPlaneUrl: DATA_PLANE_URL,
  loglevel: RudderClient.LogLevel.VERBOSE,
  autoCollectAdvertId: true,
})
To set the advertisement ID yourself, you can use the putAdvertisingId method as shown:
RudderClient.putAdvertisingId("SampleAdvertisingId")For the iOS (Obj-C) SDK, you need to call theputAdvertisingIdmethod before callinginitialize.
Setting the device token
You can pass your device-token for push notifications to be passed to the destinations which support the Push Notifications feature. RudderStack sets the token under context.device.token.
An example of setting the device-token is as shown:
RudderClient.putDeviceToken("sampleDeviceToken");Debugging
If you face any unexpected behavior while using the SDK, you can turn on the VERBOSE or DEBUG logging feature to determine out the issue.
You configure logging behavior of your SDK by sending the value of the logLevel property of the configuration object and pass it over to the initialize call as shown below:
RudderClient.initialize( WRITE_KEY , {
  dataPlaneUrl: DATA_PLANE_URL ,
  logLevel: RudderClient.LogLevel.VERBOSE,
  trackLifecycleEvents: true
})
FAQ
Where can I find the source write key?
Once you set up a Cordova source in the RudderStack dashboard, you will be able to view the source Write Key, under the Setup tab:
Do I need to add anything to my Android ProGuard rules?
If you are facing any event delivery issues in your production environment, verify if you have added the following line in your ProGuard rules:
-keep class com.rudderstack.android.** { *; }