You will also need the data plane URL associated with your RudderStack workspace.
In the dashboard, the Setup tab for the source has an SDK installation snippet containing both the write key and the data plane URL. You can use it to integrate the React Native SDK into your project.
Installing the React Native SDK
The recommended way to install the React Native SDK is through npm.
To add the SDK as a dependency, perform the following steps:
Go to the root of your application and add @rudderstack/rudder-sdk-react-native as a dependency as shown:
Determines if the SDK will collect the advertisement ID.
false
recordScreenViews
boolean
Determines if the SDK should capture screen view events automatically.
false
dbEncryption
DBEncryption
Determines whether to encrypt/decrypt the database using the specified key. See Encrypting RudderStack databases for more information.
-
controlPlaneUrl
string
If you are using our open-source Control plane lite utility, use this option to point to your hosted sourceConfig. SDK will add /sourceConfig along with this URL
https://api.rudderlabs.com
Gzip requests
The Gzip feature requires rudder-server v1.4.0 or higher. Otherwise, your events might fail.
The React Native SDK lets you automatically compress your event requests using Gzip. Note that this feature is enabled by default. To turn off this feature, set the Gzip parameter to false while initializing the SDK:
The identify call lets you identify a visiting user and associate them to their actions. It also lets you record the traits about them like their name, email address, etc.
Once a user is identified, the SDK persists all user information and passes it to the successive track or screen calls. To reset the user identification, you can use the reset method.
Note that:
For older SDK versions (< v1.9.0), the React Native SDK captures the device ID and uses that as anonymousId for identifying the user. This helps the SDK to track the users across the application installation.
Starting from v1.9.0 the SDK uses a UUID as anonymousId instead of the device ID. If you are upgrading from a previous SDK version, see How RudderStack sets anonymous ID for more information on how the SDK collects and sets anonymousId.
How SDK sets device ID for Android and iOS
On Android devices, the deviceId is assigned during the first boot. It remains consistent across the applications and installs and changes only after factory reset.
According to Apple documentation, multiple apps from the same vendor are assigned the same deviceId. If all applications from the vendor are uninstalled and then reinstalled, then they are assigned a new deviceId.
Disabling device ID collection
Starting from v1.9.0, you can disable the collection of device ID by setting collectDeviceId in the Configuration object to false.
You will observe the following changes when this property is set to false:
The SDK does not send context.device.id as a part of the event payload.
The SDK replaces the existing anonymousId (if it is equal to the device ID) with a UUID.
These changes are introduced to make the SDK more compliant with all policies around the device ID collection.
If you are upgrading to the latest SDK from a previous version (< v1.9.0) and disabling device ID collection using collectDeviceId:false:
Make sure your user transformations are not dependent on context.device.id as the SDK will not send this value in the event payload.
The context.device.id column in your warehouse destination will not be populated henceforth (it will still contain data populated by the previous SDK version).
How SDK sets anonymous ID
For fresh installation
RudderStack uses UUID as anonymousId regardless of whether collectDeviceId is set to true or false.
For SDK updated from older version
If you have updated your React Native SDK from an older version (< v1.9.0), then:
RudderStack will continue to use the device ID as anonymousId - it will not break the existing SDK behavior until you set collectDeviceId to false.
If you set collectDeviceId to false, the SDK checks if the existing anonymousId is a device ID. If yes, it sets a new UUID as the anonymousId.
If you have used the putAnonymousId method to set your own anonymousId, then the SDK will not modify it even if you set collectDeviceId to false.
Overriding anonymous ID
You can use the putAnonymousId method to override and set your own anonymousId:
rudderClient.putAnonymousId(ANONYMOUS_ID)
Retrieving anonymous ID
You can retrieve the anonymous ID (either set by the SDK or the user via putAnonymousId) using the following snippet:
You can disable these events by passing trackAppLifecycleEvents as false in the configuration object. However, we recommend keeping them enabled.
Screen
You can use the screen call to record whenever the user sees a screen on the mobile device. You can also send some extra properties along with this event.
An example of the screen event is as shown:
rudderClient.screen("Main Activity",{foo:"bar",})
Alternatively, you can use the following method signature:
Name
Data Type
Required
Description
screenName
String
Yes
Name of the screen viewed by the user.
property
Object
No
Extra property object to pass along with the screen call.
option
Object
No
Extra options passed along with screen event.
Automatic screen recording
You can enable the automatic recording of screen views by passing recordScreenViews as true while initializing the rudderClient. This automatically sends a screen call for every screen that a user views. By default, recordScreenViews is set to false.
The recordScreenViews parameter records the screen views of the native Android Activities or the iOS Views only and not by the React Native Views.
To track the screen views of the React Native Screens, you can use the following code snippet:
RudderStack’s group method lets you link an identified user with a group, such as a company, organization, or an account. You can also record any traits associated with the group like the company name, number of employees, etc.
The group call has the following method signature:
Name
Data Type
Required
Description
groupId
String
Yes
Your group’s unique identifier
traits
Object
No
The group’s traits
option
Object
No
Extra options passed along with group event.
Alias
The alias call lets you associate the user with a new identification.
alias is an advanced API that lets you change the user identifier explicitly. It is useful when managing identities for some of the downstream destinations.
A sample alias call is shown:
RudderStack recommends using the default invocation in scenarios where you only want to replace the current userId with the new userId.
Specify only new user ID without previous user ID and event-level options:
rudderClient.alias("newId")
Specify new user ID and event-level options without previous user ID:
rudderClient.alias("newId",options)
In this case, the SDK automatically populates the previousId field with the previously-persisted userId/anonymousId.
RudderStack recommends using the following invocations in cases where you want to explicitly pass the previous user ID that may be required by some downstream destinations, for example, MoEngage.
Specify new user ID and previous user ID with event-level options:
rudderClient.alias("newId","previousId",options)
Specify new user ID and previous user ID without event-level options:
rudderClient.alias("newId","previousId")
The following table highlights the supported alias API parameters:
Name
Data type
Description
newId Required
String
The new identifier (userId) to assign to the user.
previousId
String
The old user identifier.
Note that:
The React Native SDK supports explicitly passing the previousId field from v2.0.0 onwards.
If not provided explicitly, the SDK populates this field with the current userId/ anonymousId.
options
Object
Event-level options.
Once you make the alias call, RudderStack replaces the old userId with the new user identifier (newId) and persists that identification across the sessions.
Reset
You can use the reset method to clear the persisted user traits. It also resets the anonymousId with a new UUID if you call it with true (for SDK v1.19.0 and later).
awaitrudderClient.reset(true)
To clear only user traits, call reset with false.
It is highly recommended to use the await keyword with the reset call.
Encrypting RudderStack databases
This feature is available in the React Native SDK from v1.11.0 onwards.
To enable the database encryption feature in the React Native SDK, follow these steps:
Navigate to the root of your application and add @rudderstack/rudder-plugin-db-encryption-react-native as a dependency:
The DBEncryption class accepts the following parameters:
Parameter
Type
Description
key
string
Key used to encrypt/decrypt the database.
enable
boolean
Specifies whether to encrypt/decrypt the database
To remove encryption from a database, configure the DBEncryption object with your encryption key and set enable to false.
Instructions for iOS
The rudder-plugin-db-encryption-react-native uses the SQLCipher Cocoapod under the hood to perform encryption. This Cocoapod requires the removal of any references to the standard SQLite system library for it to function as expected.
If you set up a project to inadvertently include a linking reference against the standard SQLite library before SQLCipher, it is possible that the application builds and runs correctly but does not use SQLCipher for encryption. This is not a problem for most projects but there are certain cases where unintentional SQLite linking can occur.
One such example is when using CocoaPods or some other sub-project that declares a dependency on the SQLite3 library. In this case, adding a pod to a project can silently modify the project settings in such a way that SQLCipher is not properly linked.
You can identify and fix the above linking issue during the development stage by looking for the below error log from the SDK:
RSDBPersistentManager: createDB: Cannot encrypt the Database as SQLCipher wasn't linked correctly.
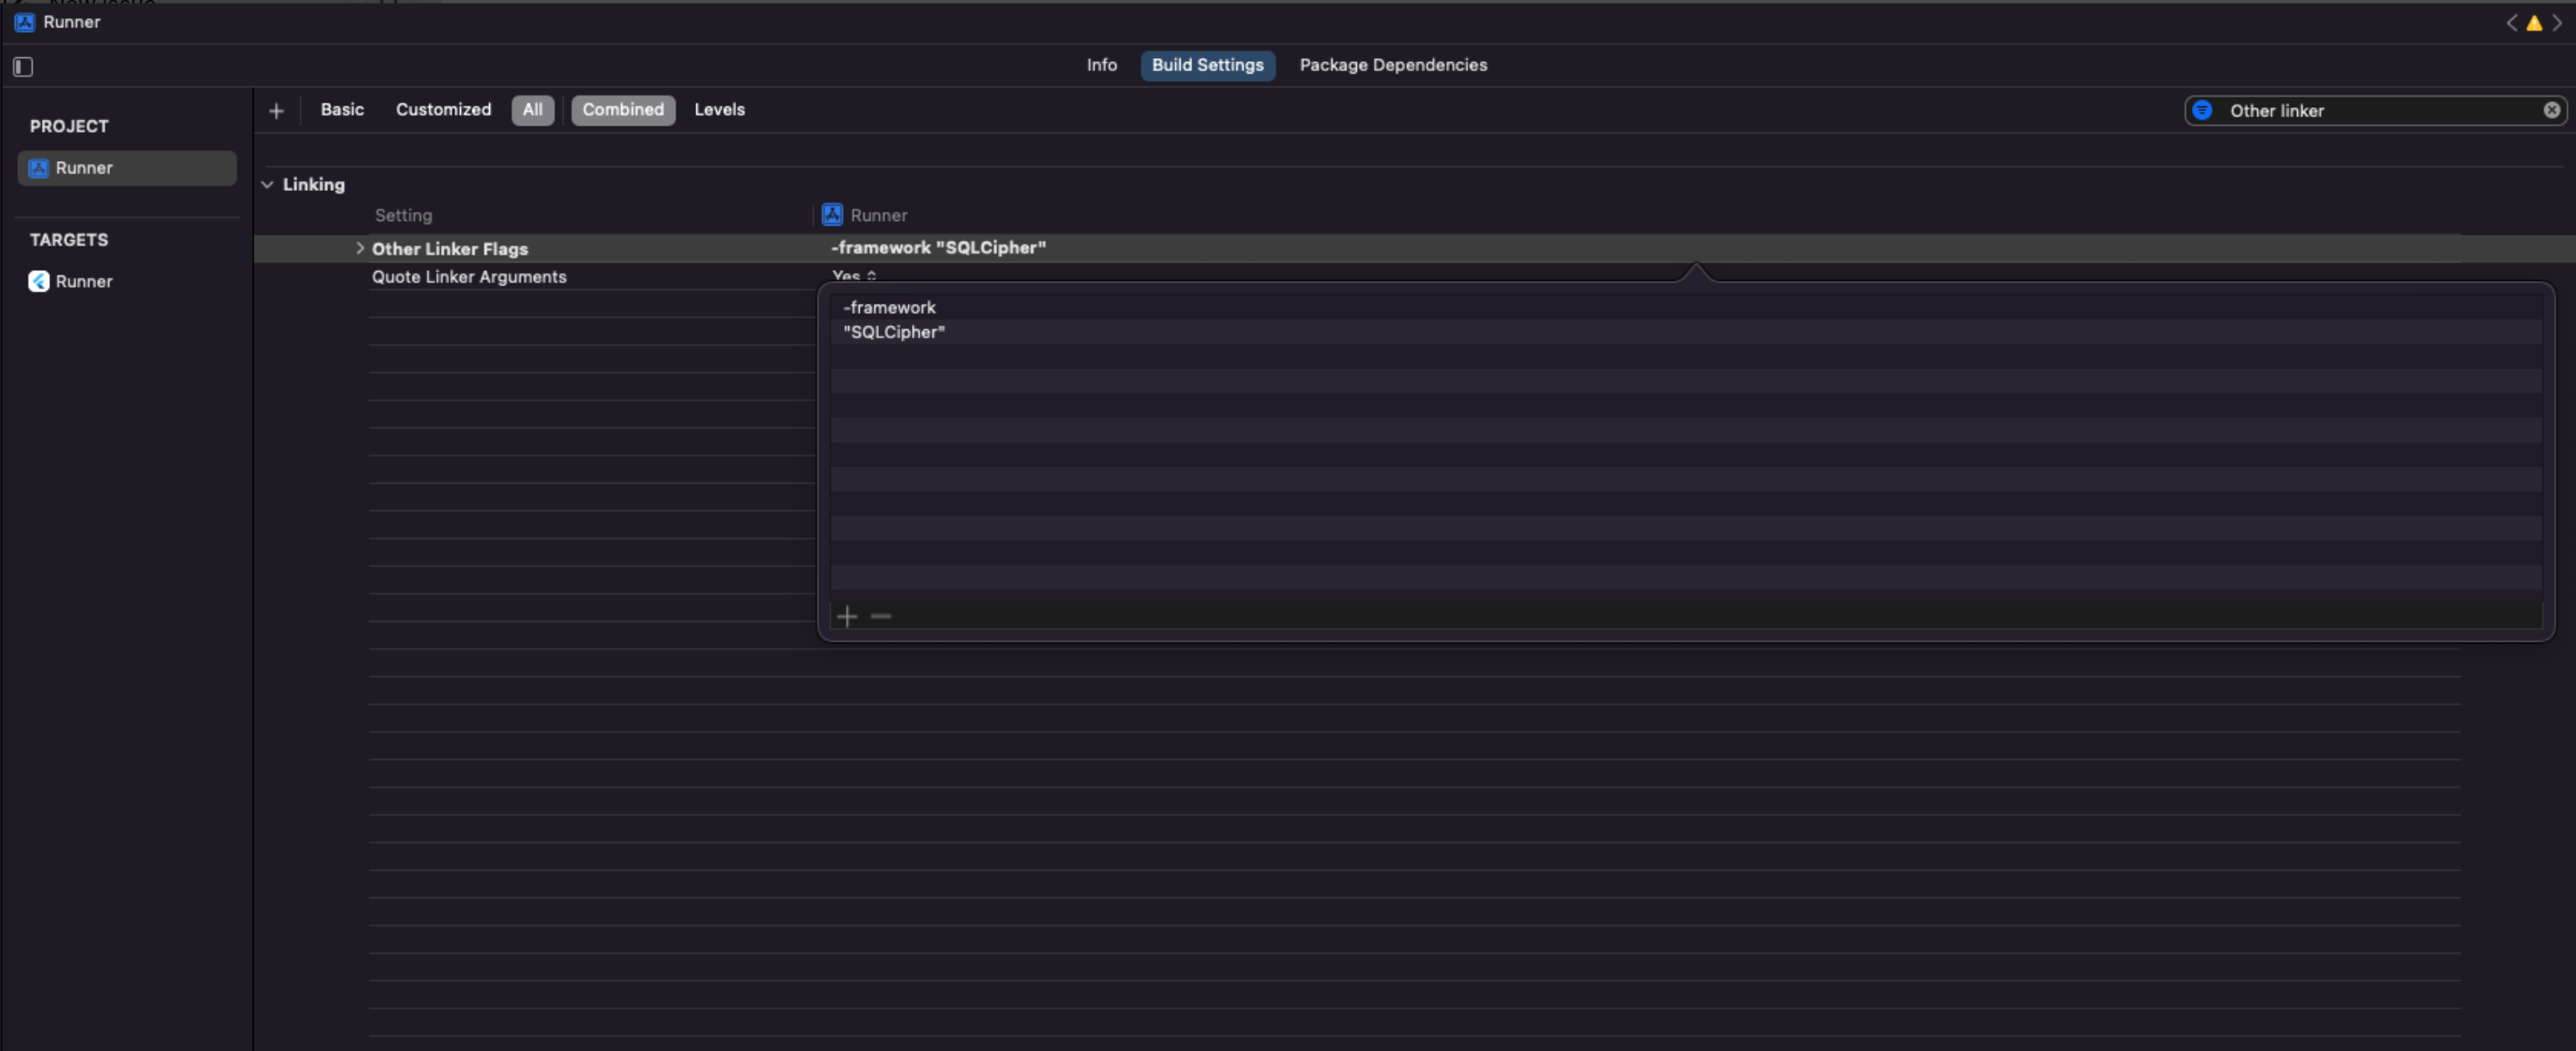
To fix the linking issue, add a linker flag to your project settings to ensure that the Xcode links SQLCipher before SQLite. Follow these steps:
Open the project-level build settings. These are the global project settings, not for the individual application target.
Locate the Other Linker Flags setting and add one of the following commands depending on how you are integrating SQLCipher into the app.
If you are not adding SQLCipher into the app on your own and only using rudder-plugin-db-encryption-react-native, then see only the points 3 and 4 in the below table - depending on whether you are using use_frameworks! in your app’s ios/Podfile.
Scenario
Command
Notes
When using SQLCipher commercial edition static libraries
Adjust according to the path to the libsqlcipher-ios.a you received as a part of the package.
When using the sqlcipher.xcodeproj included in the SQLCipher Git repository
$(BUILT_PRODUCTS_DIR)/libsqlcipher.a
-
When using the SQLCipher CocoaPod with the use_frameworks Podfile setting enabled
-framework SQLCipher
-
When using the SQLCipher CocoaPod without the use_frameworks Podfile setting enabled
-lSQLCipher
-
Once the linker flag is added to the project-level build settings, you should see something like the below image:
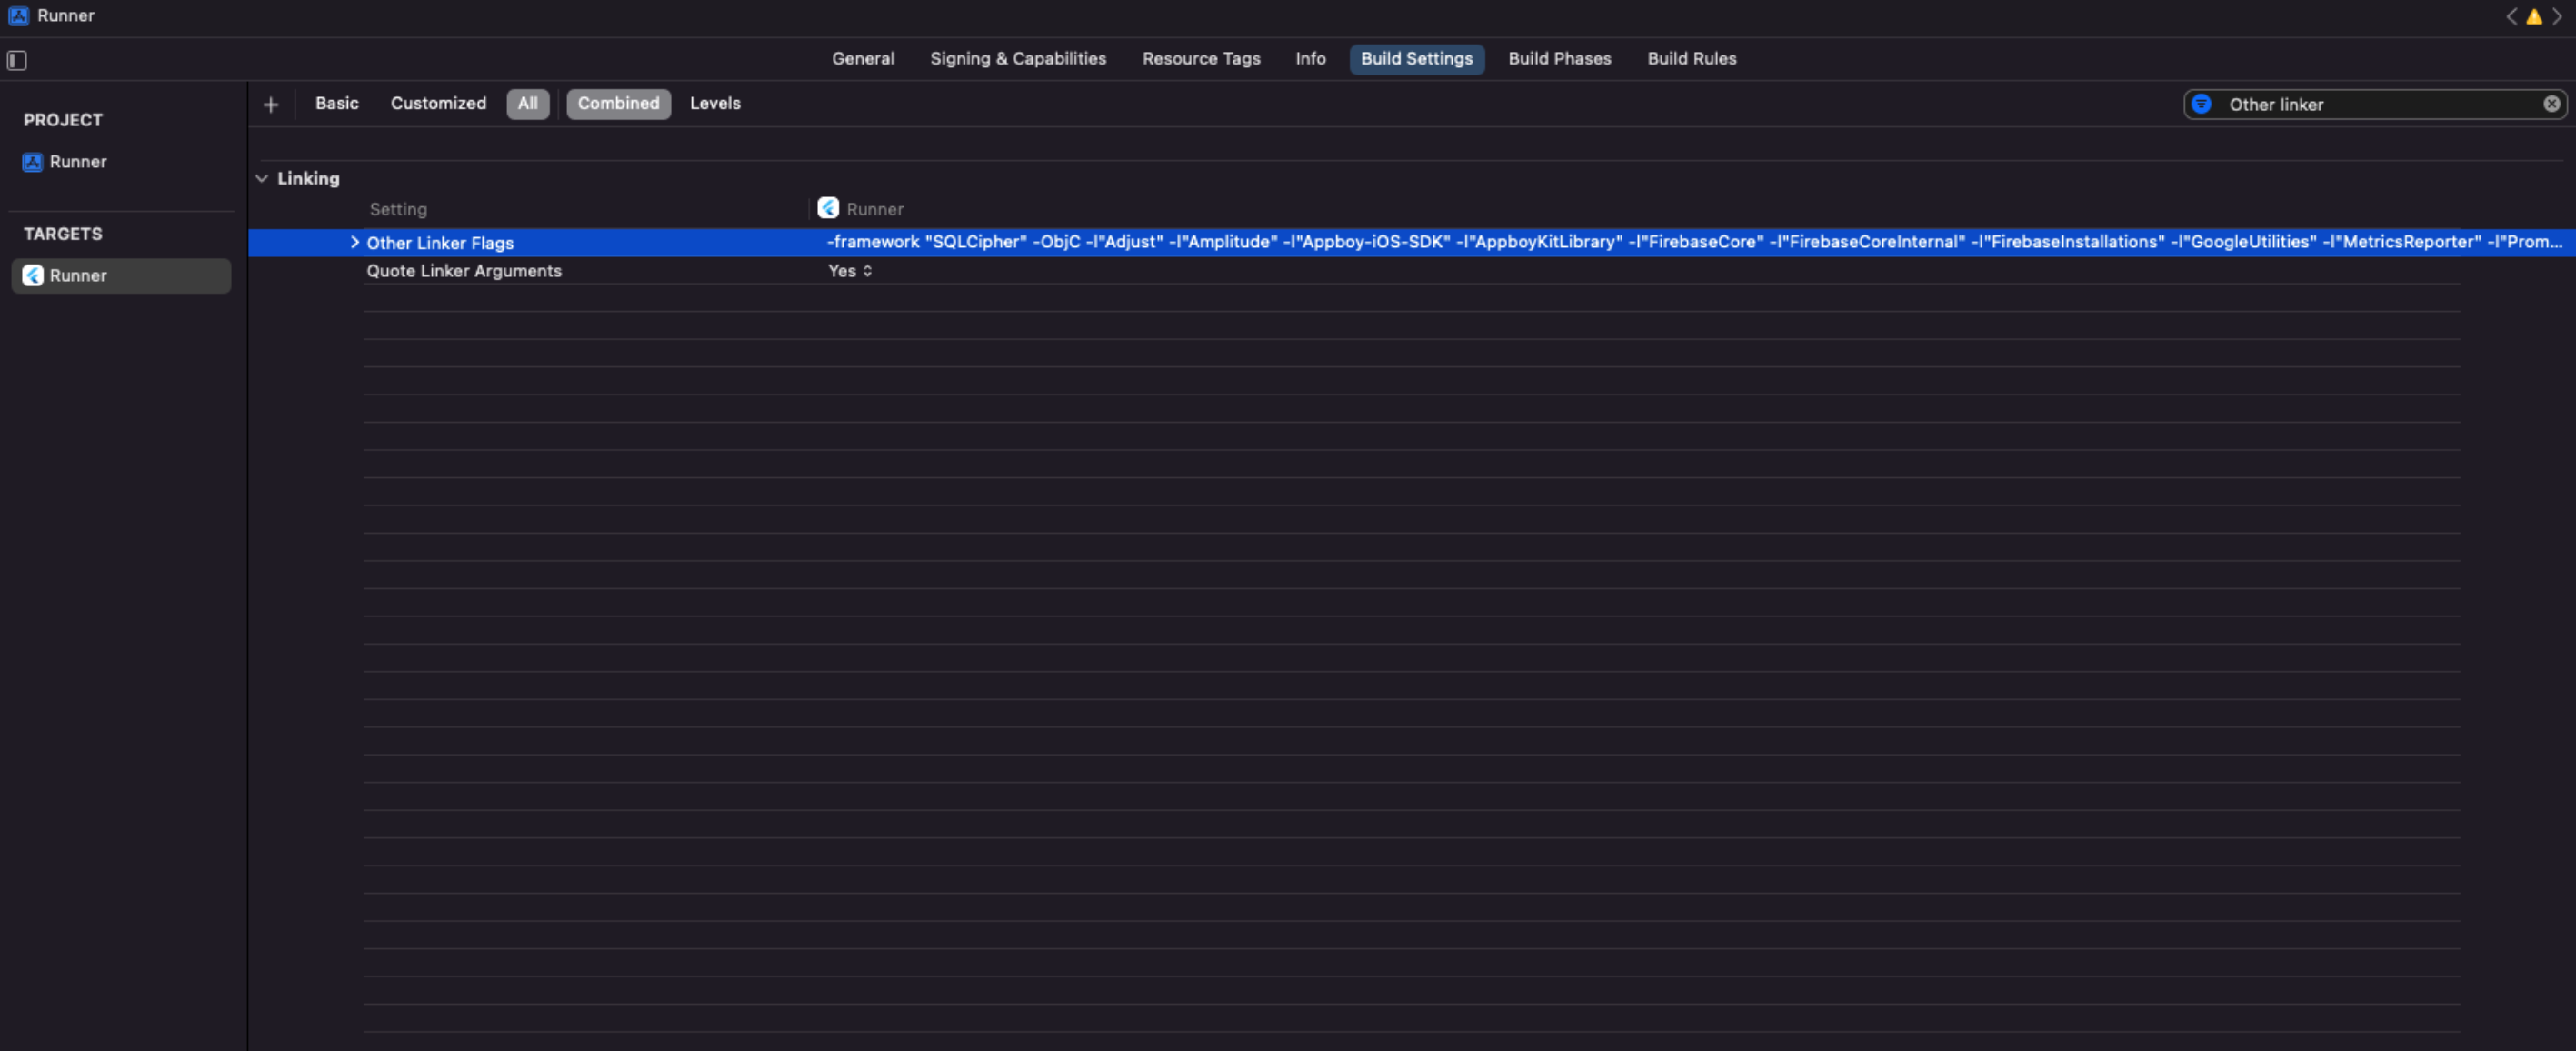
After adding the linker flag to your project-level build settings, check the target-level build settings to ensure SQLCipher is shown first, as seen below:
Enabling/disabling user tracking via the optOut API (GDPR support)
RudderStack gives the users (e.g., an EU user) the ability to opt out of tracking any user activity until the user gives their consent. You can do this by leveraging RudderStack’s optOut API.
The optOut API takes true or false as a Boolean value to enable or disable tracking user activities. This flag persists across device reboots.
The following snippet highlights the use of the optOut API to disable user tracking:
awaitrudderClient.optOut(true)
Once the user grants their consent, you can enable user tracking once again by using the optOut API with false as a parameter sent to it:
awaitrudderClient.optOut(false)
The optOut API is available in the React Native SDK starting from version 1.0.14.
Sending tracked events before closing or backgrounding apps
This feature is available only for the iOS and tvOS platforms as it relies on their background mode capabilities.
To ensure that the events tracked using the React Native SDK just before closing or backgrounding your app are sent to RudderStack immediately and not upon the next app launch, set enableBackgroundMode to true while initializing the SDK.
By doing so, your app requests iOS for an additional background run time which allows the SDK to send all the tracked events before the app is closed or backgrounded.
There is no fixed background run time for the app as it is completely abstracted by iOS. For more information, see this iOS background modes tutorial.
Tracking user sessions
By default, the React Native SDK automatically tracks user sessions. RudderStack automatically determines the start and end of a user session depending on the inactivity time configured in the SDK (default time is 5 minutes).
To automatically track sessions in the React Native SDK, trackAppLifecycleEvents should also be set to true. This is because RudderStack considers the Application Opened, Application Installed, or Application Updated events as the start of a new session.
construdderInitialise=async()=>{awaitrudderClient.setup(WRITE_KEY,{dataPlaneUrl: DATA_PLANE_URL,trackAppLifecycleEvents: true,autoSessionTracking: true,// Set to false to disable automatic session tracking
sessionTimeout: 5*60*1000,});};rudderInitialise().catch(console.error);
To disable automatic session tracking, set autoSessionTracking to false.
For more information on user sessions and how to track them using the React Native SDK, see Session Tracking.
Getting the session ID
To fetch the session ID of the current session, you can use the getSessionId method of the SDK. If the session ID is unavailable, this method returns a null value.
getSessionId() is available in the React Native SDK from v1.10.0 onwards.
constsessionId=awaitrudderClient.getSessionId();
Setting custom context
This feature is available in the React Native SDK v1.14.0 and later.
To set custom contextual information in the React Native SDK, pass the options object as shown:
The SDK treats any other fields in the options object except externalId, externalIds, or integrations as custom context and includes them in the context object.
While initializing SDK
You can set custom context while initializing the SDK as follows:
You must send the options object every time you want to set custom context for a particular event. The SDK does not persist the contextual information sent in an event for the subsequent events.
The contextual information passed while sending events gets precedence over the context set during SDK initialization.
Setting the device token
You can use your device token to pass push notifications to the destinations that support them. RudderStack sets this token under context.device.token. To set a custom device token, the SDK supports the putDeviceToken method.
An example of setting a custom device token is shown below:
rudderClient.putDeviceToken(<device_token>);
Capturing advertisement ID automatically
The React Native SDK supports auto-collecting the advertisement ID only in Android and not iOS.
RudderStack automatically collects the advertisement ID from your Android apps only if autoCollectAdvertId is set to true during the SDK initialization.
To use this feature, make sure that:
com.google.android.gms.ads.identifier.AdvertisingIdClient is present in your Android app’s classpath.
limitAdTracking is not enabled for your Android device.
An example of auto-collecting your advertisement ID is shown:
The React Native SDK supports this feature for both the Android and iOS platforms.
Use the SDK’s putAdvertisingId method to manually set your Android (AAID) and iOS (IDFA) as the advertisement ID.
You can call the putAdvertisingId method before or after initializing the SDK; the SDK persists the advertisement ID values throughout the session.
Support for calling putAdvertisingId before SDK initialization is available for iOS in the React Native SDK v1.13.0 and above. In the previous versions, you can set the advertisement ID in iOS only after the SDK is initialized.
Follow these steps to set a custom advertisement ID using the putAdvertisingId method:
Import Platform:
import{Platform}from'react-native';
Use putAdvertisingId to set your advertisement ID:
The putAdvertisingId method accepts a single argument advertisingId of the string data type.
In case of Android, if you set autoCollectAdvertId to true and use putAdvertisingId to set the advertisement ID, the SDK uses the provided advertisement ID instead of collecting it automatically.
Clearing advertisement ID
Use the clearAdvertisingId method to clear the existing advertisement ID:
awaitrudderClient.clearAdvertisingId();
Note the following:
Make sure to call clearAdvertisingId only after initializing the SDK.
In case of Android, using clearAdvertisingId to reset the advertisement ID causes the SDK to starts auto-collecting the advertisement ID again if autoCollectAdvertId is set to true. To stop auto-collecting the advertisement ID, you must set autoCollectAdvertId to false.
Registering callbacks
The React Native SDK lets you trigger a callback once any device-mode integration is successful. You can use this callback to perform any operation that you wanted to do once a device-integration is successful.
An example of registering a callback for App Center is as shown:
awaitrudderClient.registerCallback("App Center",()=>{console.log("App Center is ready")})
The registerCallback method has the following signatures:
Name
Data Type
Required
Description
destinationName
string
Yes
Display name of the device-mode destination.
callback
Function
Yes
Callback function to be triggered once device-mode integration is successful.
Filtering events
When sending events to a destination via device mode, you can explicitly specify which events should be discarded or allowed to flow through - by allowlisting or denylisting them.
Enabling/disabling events for specific destinations
The React Native SDK lets you enable or disable sending events to a specific destination or all destinations to which the source is connected. You can specify these destinations by creating an object as shown:
constoptions={integrations:{// default value for `All` is true
All: false,// specifying destination by its display name
Amplitude: true,Mixpanel: false,},}
The keyword All in the above snippet represents all destinations the source is connected to. Its value is set to true by default.
Make sure the destination names that you pass while specifying the destinations should exactly match the names listed here.
There are two methods in which you can pass the destinations specified in the above snippet to the SDK:
1. Passing destinations while initializing the SDK
This is helpful when you want to enable or disable sending the events across all event calls made using the SDK to the specified destinations.
rudderClient.setup(WRITE_KEY,config,options)
2. Passing destinations while making event calls
This approach is helpful when you want to enable or disable sending only a particular event to the specified destinations, or if you want to override the specified destinations passed with the SDK initialization (as described in the method above) for a particular event.
If you specify the destinations both while initializing the SDK as well as while making an event call, then the destinations specified at the event level only will be considered.
flush API
The React Native SDK supports the flush() API. It retrieves all messages present in the database, divides them into individual batches based on the specified queue size, and flushes them to the RudderStack server/backend.
For example, if the flushQueueSize is 30 and there are 180 events in the database when the flush() API is called, the SDK will retrieve all events and divide them into batches of 30 messages each, that is, into 6 batches.
If a batch fails for some reason, the SDK drops the remaining batches to maintain the sequence of the messages. A batch is considered as failed if it isn’t sent to the RudderStack server after 3 retries.
In device mode, the flush() API also calls the destination SDK’s flush() API (if applicable).
Debugging
If you run into any issues regarding the RudderStack React Native SDK, you can turn on the VERBOSE or DEBUG logging to find out what the issue is.
First, make sure you modify your import statement to include RUDDER_LOG_LEVEL with:
Then to turn on the logging, change your RudderClient initialization to the following:
awaitrudderClient.setup(WRITE_KEY,{dataPlaneUrl: DATA_PLANE_URL,logLevel: RUDDER_LOG_LEVEL.DEBUG,// or VERBOSE
})
You can set the log level to one of the following values:
NONE
ERROR
WARN
INFO
DEBUG
VERBOSE
FAQ
Do I need to link the SDK using the React Native link?
No, you don’t need to link the SDK as it is auto-linked. If you have linked it using react-native link and are facing any issues, use react-native unlink rudder-sdk-react-native to unlink it.
What is the need to use the await keyword?
The functions exposed by the SDK are asynchronous in nature. If you want a synchronous behavior, you must use the await keyword. We highly recommend using the await keyword with the setup call to make sure that the SDK has been properly set up, before any further calls are made.
Do I need to add anything to my ProGuard rules?
Add the following lines to your Android ProGuard rules if you are using Proguard full mode to optimize your app:
Add the below rules if you are using the Android (Java) SDKAndroid (Java) refers to the legacy RudderStack Android SDK. Note that it will be deprecated soon.
For new implementations, use the Android (Kotlin) SDK instead.
older than v1.20.0.
Note that the rules are bundled in the SDK itself from v1.20.0 onwards.
// Reporter Module
-keepclasscom.rudderstack.android.ruddermetricsreporterandroid.models.LabelEntity{*;}-keepclasscom.rudderstack.android.ruddermetricsreporterandroid.models.MetricEntity{*;}-keepclasscom.rudderstack.android.ruddermetricsreporterandroid.models.ErrorEntity{*;}// Required for the usage off TypeToken class in Utils.converToMap, Utils.convertToList
-keepclasscom.google.gson.reflect.TypeToken{*;}-keepclass* extendscom.google.gson.reflect.TypeToken// Required for the serialization of SourceConfig once it is downloaded.
-keepclasscom.google.gson.internal.LinkedTreeMap{*;}-keepclass* implementsjava.io.Serializable{*;}-keepclasscom.rudderstack.rudderjsonadapter.RudderTypeAdapter{*;}-keepclass* extendscom.rudderstack.rudderjsonadapter.RudderTypeAdapter// Required to ensure the DefaultPersistenceProviderFactory is not removed by Proguard
// and works as expected even when the customer is not using encryption feature.
-dontwarnnet.sqlcipher.Cursor-dontwarnnet.sqlcipher.database.SQLiteDatabase$CursorFactory-dontwarnnet.sqlcipher.database.SQLiteDatabase-dontwarnnet.sqlcipher.database.SQLiteOpenHelper-keepclasscom.rudderstack.android.sdk.core.persistence.DefaultPersistenceProviderFactory{*;}// Required for the usage of annotations across reporter and web modules
-dontwarncom.fasterxml.jackson.annotation.JsonIgnore-dontwarncom.squareup.moshi.Json-dontwarncom.fasterxml.jackson.annotation.JsonProperty// Required for Device Mode Transformations
-keepclasscom.rudderstack.android.sdk.core.TransformationResponse{*;}-keepclasscom.rudderstack.android.sdk.core.TransformationResponseDeserializer{*;}-keepclasscom.rudderstack.android.sdk.core.TransformationRequest{*;}
How do I get the user traits after making an identify call?
You can get the user traits after making an identify call as shown:
construdderContext=awaitrudderClient.getRudderContext();console.log('Traits are : '+JSON.stringify(rudderContext.traits));
How does the React Native SDK handle events larger than 32KB?
The React Native SDK drops any events greater than 32KB.
Questions? We're here to help.
Join the RudderStack Slack community or email us for support
This site uses cookies to improve your experience while you navigate through the website. Out of
these
cookies, the cookies that are categorized as necessary are stored on your browser as they are as
essential
for the working of basic functionalities of the website. We also use third-party cookies that
help
us
analyze and understand how you use this website. These cookies will be stored in your browser
only
with
your
consent. You also have the option to opt-out of these cookies. But opting out of some of these
cookies
may
have an effect on your browsing experience.
Necessary
Always Enabled
Necessary cookies are absolutely essential for the website to function properly. This
category only includes cookies that ensures basic functionalities and security
features of the website. These cookies do not store any personal information.
This site uses cookies to improve your experience. If you want to
learn more about cookies and why we use them, visit our cookie
policy. We'll assume you're ok with this, but you can opt-out if you wish Cookie Settings.