How to Migrate Snowflake Authentication to Key-Pair Auth in RudderStack
Migrate to Snowflake’s key-pair authentication mechanism for enhanced security.
6 minute read
This guide shows you how to safely migrate from Snowflake’s username/password-based authentication to key-pair authentication across all the product integrations supported by RudderStack.
Reach out to RudderStack Support if you need any help with migrating your Snowflake integrations to key-pair authentication.
Introduction
RudderStack supports Snowflake’s key-pair authentication across the following product integrations:
Snowflake requires that all users have enabled two-factor authentication by April, 2025. At that time, key-pair authentication is required if you plan to authenticate a Snowflake user in RudderStack.
Migration overview
Estimated time: 15 minutes
While completing this migration, you will be able to verify that your pipelines and jobs are functioning properly. Note that even if the key-pair authentication fails, and syncs and/or jobs fail, there will be no event loss and any syncs or jobs can be retried.
See below for verifying that your pipelines and jobs are properly authenticating after migrating to key-pair authentication.
You can generate a Snowflake key-pair in your computer’s terminal. See the Snowflake documentation for more details on generating a key-pair.
Option 1: Unencrypted private key (no passphrase)
# Generate a 2048-bit private key and convert to PKCS8 formatopenssl genrsa 2048| openssl pkcs8 -topk8 -inform PEM -out rsa_key.p8 -nocrypt
# Extract the public keyopenssl rsa -in rsa_key.p8 -pubout -out rsa_key.pub
Option 2: Encrypted private key (with passphrase)
# Generate the private keyopenssl genrsa 2048| openssl pkcs8 -topk8 -v2 des3 -inform PEM -out encrypted_rsa_key.p8
# Generate a public keyopenssl rsa -in encrypted_rsa_key.p8 -pubout -out rsa_key.pub
Note that you will be prompted a few times to enter a passphrase.
Step 3: Upload the public key to Snowflake
For every unique user found in Step 1, you will need to ensure that there is a public key assigned to them in Snowflake.
Follow these steps:
Open the public key file (rsa_key.pub) and copy the base64-encoded key block only and exclude the BEGIN and END lines. A sample terminal code you can run to fetch your public key in the terminal is shown:
cat rsa_key.pub
Then, from this information:
-----BEGIN PUBLIC KEY-----
MIIBIjANBgkq...
-----END PUBLIC KEY-----
(Optional) To rotate keys safely, you can also set a secondary key as shown:
ALTERUSERyour_user_nameSETRSA_PUBLIC_KEY_2='...';
Step 4: Update RudderStack configuration
For every destination, source and Profiles project found in Step 1, you will need to update the configuration to use key-pair authentication.
You will need the private key and provide it to RudderStack for authenticating the integration.
A sample terminal code you can run to fetch your private key in the terminal:
# example for unencrypted
cat rsa_key.p8
# example for encrypted
cat encrypted_rsa_key.p8
Protect this sensitive private key along with the passphrase (if applicable).
Warehouse destination
Go to the RudderStack dashboard.
Navigate to your Snowflake warehouse destination and go to the Configuration tab.
Turn on the Use Key Pair Authentication toggle.
Paste the full contents of your private key file (rsa_key.p8 or encrypted_rsa_key.p8).
Include the ----BEGIN PRIVATE KEY----- and ----END PRIVATE KEY----- lines.
For an encrypted key, provide the Passphrase used during the key generation.
RudderStack requires a non-empty passphrase for encrypted private keys.
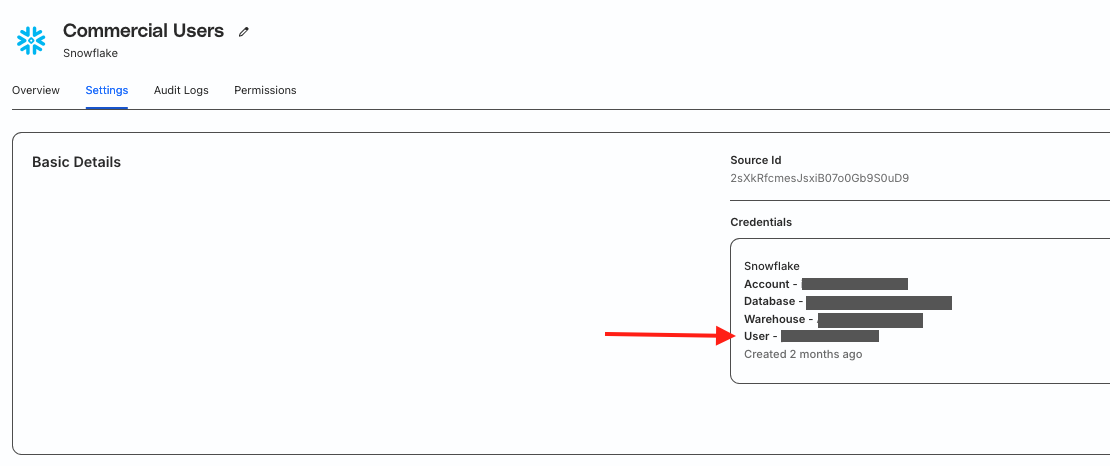
Reverse ETL source
Go to your Snowflake source.
Go to the Settings tab and click on the Edit button next to the credentials.
Click Add new credentials and make sure to choose Key Pair Authentication.
Paste the full contents of your private key file (rsa_key.p8 or encrypted_rsa_key.p8).
Include the ----BEGIN PRIVATE KEY----- and ----END PRIVATE KEY----- lines.
For an encrypted key, provide the Passphrase used during the key generation.
RudderStack requires a non-empty passphrase for encrypted private keys.
Save the changes to use the new credentials (existing credentials cannot be edited).
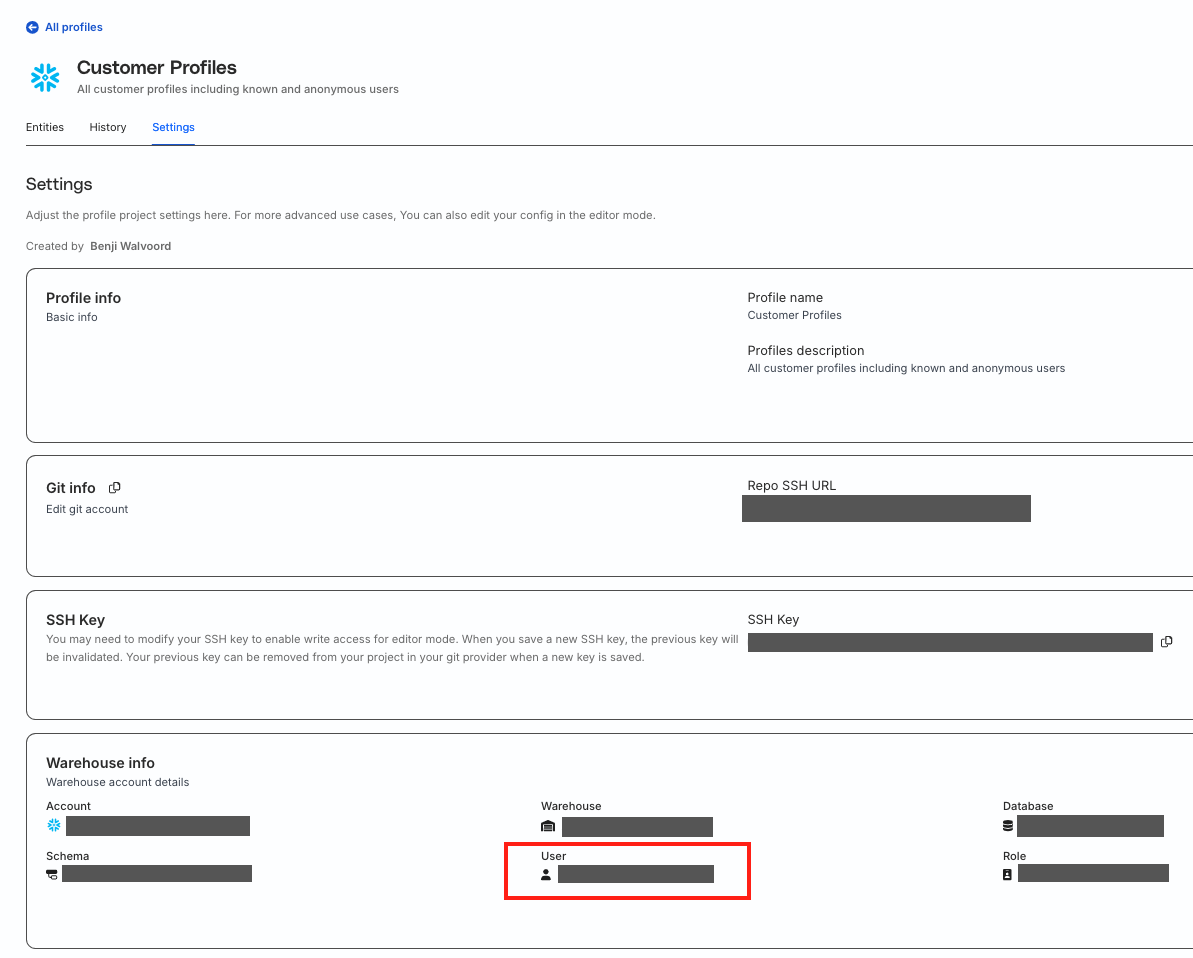
Profiles project
Go to the RudderStack dashboard.
Navigate to your Snowflake Profiles project and click the Settings tab.
Click the edit button in the Warehouse Info.
Turn on the Use Key Pair Authentication toggle.
Paste the full contents of your private key file (rsa_key.p8 or encrypted_rsa_key.p8).
Include the ----BEGIN PRIVATE KEY----- and ----END PRIVATE KEY----- lines.
For an encrypted key, provide the Passphrase used during the key generation.
RudderStack requires a non-empty passphrase for encrypted private keys.
Step 5: Verify pipeline functionality
After updating to key-pair authentication, follow these steps to ensure that your pipelines, syncs, and jobs are still functioning properly:
Warehouse destination
To save any changes to your warehouse destination, RudderStack will verify that the credentials are sufficient and validate access.
After the key-pair auth is configured, you can navigate to the Configuration tab for any of your warehouse destinations and select Edit Configuration> Finish. Doing so causes RudderStack to re-validate access even if no changes were made.
You can also ensure that your warehouse syncs are still happening correctly.
Reverse ETL source
To save any changes to your Reverse ETL source, RudderStack will verify that the credentials are sufficient and validate access.
After switching your credentials to the new key-pair auth, you can navigate to the Settings tab for any of your Reverse ETL sources, and select the edit button for Credentials, and then Verify. Doing so causes RudderStack to re-validate access even if no changes were made.
You can also ensure that your Reverse ETL syncs are still happening correctly.
Profiles project
To save the changes when you are configuring the key-pair authentication, press the Verify Credentials button. This ensures that the Profiles project is created or edited with sufficient authentication.
After the key-pair auth is configured, you can run a Profiles job and make sure it runs successfully.
(Optional) Step 6: Enforce 2FA and remove password authentication
Once you have confirmed that all RudderStack pipelines are working correctly, you can enable 2FA in Snowflake for your user.
Questions? We're here to help.
Join the RudderStack Slack community or email us for support
This site uses cookies to improve your experience while you navigate through the website. Out of
these
cookies, the cookies that are categorized as necessary are stored on your browser as they are as
essential
for the working of basic functionalities of the website. We also use third-party cookies that
help
us
analyze and understand how you use this website. These cookies will be stored in your browser
only
with
your
consent. You also have the option to opt-out of these cookies. But opting out of some of these
cookies
may
have an effect on your browsing experience.
Necessary
Always Enabled
Necessary cookies are absolutely essential for the website to function properly. This
category only includes cookies that ensures basic functionalities and security
features of the website. These cookies do not store any personal information.
This site uses cookies to improve your experience. If you want to
learn more about cookies and why we use them, visit our cookie
policy. We'll assume you're ok with this, but you can opt-out if you wish Cookie Settings.