How we built RudderStack’s real-time personalization engine


As more companies fine-tune the customer journey to cater to individual visitors, personalization has emerged as a crucial initiative for many data teams. When done well, the results can create a significant competitive advantage.
The most powerful form of personalization is also the most difficult to build: real-time website and app experiences. These projects are complex for two primary reasons:
- Personalization requires a clean identity graph and a complete view of the customer as inputs and to drive the logic that delivers the right experience
- Identifying users, accessing the customer profile, and dynamically changing the experience on a website or app—all in real time— is a complex technical challenge that requires significant engineering effort
Working with our customers, we’ve built solutions to both of those problems and in this post, we’re going to break down our real-time website personalization workflow, from identity resolution to tracking the success of the experiment.
Our use case: dynamic calls-to-action

Our goal in this project was simple: for users who had already created a RudderStack account, don’t show calls-to-action asking them to create an account or try RudderStack for free (because they had already signed up!). Instead, present them with some other conversion opportunity that is more relevant to where they are in their customer journey. In our case, we wanted to get more of those users to request a demo.
Here were the specific requirements:
- Users who haven’t signed up for RudderStack see a ‘Try for free’ CTA as the primary button in the header
- Users who have already signed up see a ‘Request Demo’ CTA as the primary button in the header
As basic as that sounds, it’s surprising how many companies present users with calls-to-action that they’ve already done—until you dig into the technical guts.
While not rocket science, the amount of engineering required is significant. In this specific case, you might explore maintaining state from your application, but that requires a huge effort on both the front and back-end. Even if you can maintain state, marketing teams will always want to personalize a much wider range of user data, meaning there’s an underlying need to access complete customer profiles in real-time. For example, our marketing team already has plans to create personalized website experiences based on:
- Account data, like company size and industry
- Recent content viewed, like integrations and case studies
- Funnel position (high intent, low intent)
Thankfully, our stack will make it incredibly easy to roll out these additional personalization use cases when the marketing team is ready.
“Across the data and web teams, we shipped this project in less than 5 days, which was incredibly fast based on my experience. At past companies, it took us many months to build out real-time use cases like this, and even then they were hard to scale and maintain. With this setup, we can deploy new tests for marketing in a few hours.”

Gerlando Piro, Head of Web Presence at RudderStack
Overview: our real-time personalization architecture
Here’s an architecture diagram that shows the basic data flow, as well as a high-level overview of the steps involved in building the end-to-end use case. In the second part of the post, we dig into the step-by-step technical details of each piece.

This was our plan for how to execute the data flow:
- Build the list of users we wanted to target in Snowflake using RudderStack Profiles
- Make that data set available in real-time through RudderStack’s Activation API
- When users visit the site, ping the API with their anonymousId and pull down the relevant data (in this case, app signup status)
- Depending on the returned data, change the button in the header
Here’s a bit more detail on the specific steps we took:
Step 1: Resolve user identities
The first major challenge is looking up a user who may have multiple IDs in real-time and returning the right data for the right user. In this case, a user could have multiple anonymousId values associated with their profile from different web sessions on different devices, and we needed to return the right user’s information no matter which anonymousId we sent to the API.
Thankfully, our core customer 360 project in Profiles was already generating our core identity graph, including resolved records for users who had signed up for the app. So, in this case, we were able to leverage an existing ID graph and start building the features we wanted right away.
Step 2: build features that drive personalization logic
Even though our primary Profiles project already had all of the traits the business needed as part of the customer 360 table, it would have been heavy-handed (and costly) to sync the entire data set for such a specific use case.
Also, to make the logic easier for our front-end engineering team, we wanted to generate a new feature (user_app_signup) that represented signup status as a boolean value (as opposed to a timestamp). Because we already had the ID graph, building the features was straightforward (you can see example YAML definitions in the technical deep dive below).
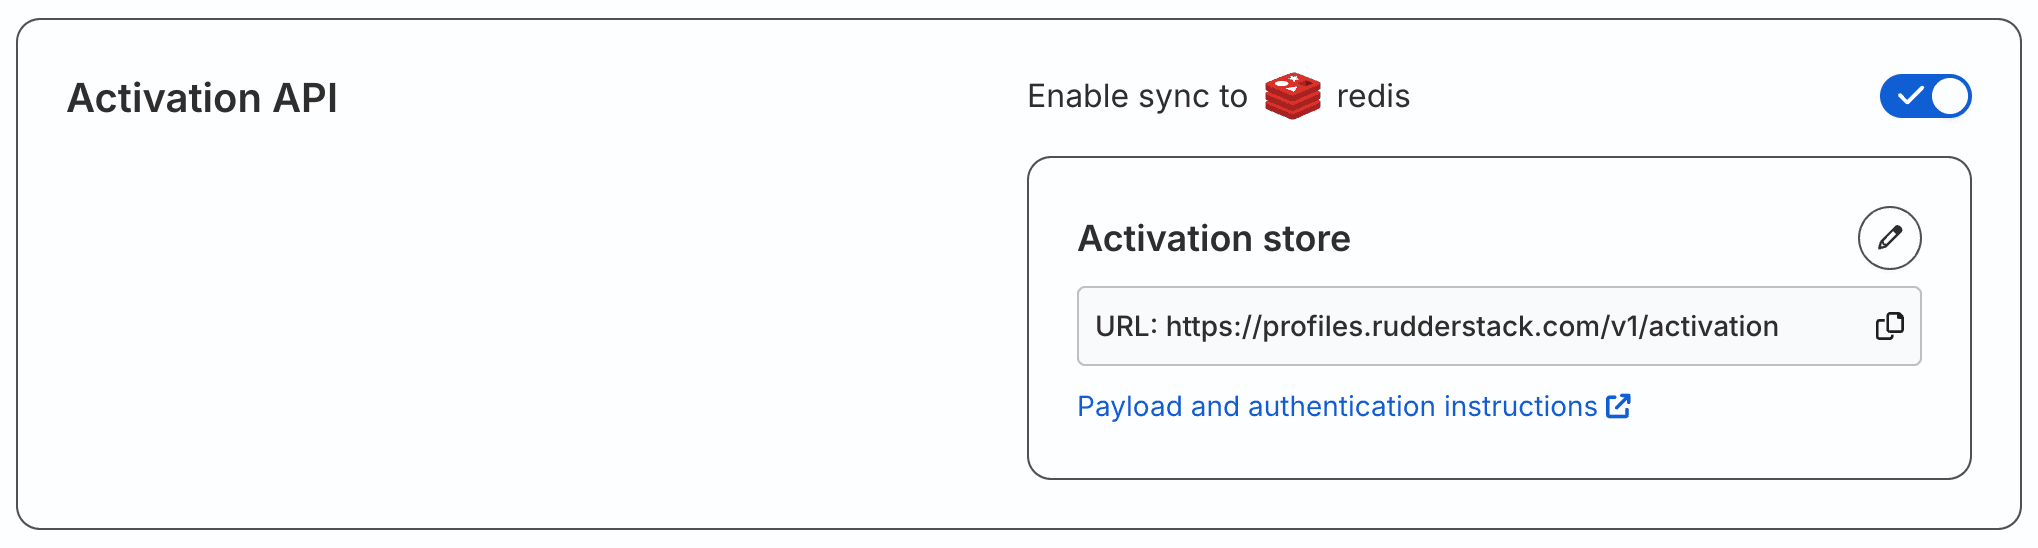
Step 3: make the profiles available in real-time, via API
This would normally be the hardest part, but with RudderStack’s Activation API, it was as easy as adding our Redis credentials and toggling on the API setting in our Profiles project in RudderStack. Once the initial sync completed, all of our user data was accessible in real-time through the Activation API.
Step 4: integrate the API into our front end to change the user experience
At this point, our data engineer handed off the API endpoint and credentials to our frontend engineering team. Using Vercel middleware, they were able to grab the user’s anonymousId, pass it to the Activation API, pull down user signup status, and change the frontend—almost instantaneously.
Best of all, they were able to integrate experiment tracking seamlessly through RudderStack’s JavaScript SDK (see the full frontend implementation and tracking detail in the technical deep dive below).
Technical deep dive: step-by-step implementation
Step 1: Resolve user identities

One really nice thing about Profiles is that you don’t have to reinvent the wheel every time you have a new use case for your identity graph or customer 360 data. In this specific case, our existing identity graph had all of the resolved user records already, we just needed to filter the graph down to the specific users we wanted to target and then build a few features on top of it.
First, we created a new Profiles project called “Web Personalization” and imported a filtered version of our existing ID graph.
The filters we implemented were:
- Limit to users seen in the last 30 days
- User has at least 1 non-anonymous ID
These filters served two purposes. First, we wanted to target users who had some relatively recent activity, which would increase the likelihood that they would come back to the site and see the updated call-to-action. Second, to control costs, we wanted to limit the amount of data we were pushing to Redis.
To import the existing ID graph and filter it, we used a Profiles SQL Model (see the sample code below). This saved our data engineer a huge amount of time in getting the project live.
SQL
Profiles projects require an id_stitcher model, but because we imported the existing graph through a SQL Model, all we needed to do was set edge_sources as the SQL Model:
YAML
Here’s what the final ID graph looks like when previewed in the RudderStack UI (which is reading directly from the Snowflake table):

Step 2: build features that drive personalization logic
In this step, we needed to generate a user feature for signup status and import several existing features.
Building features in Profiles involves two steps:
- Defining the inputs, which includes tables you want to use as well as the columns in those tables that represent identifiers
- Writing simple, declarative definitions for the features themselves (we call these entity_vars)
Profiles uses that configuration to generate and run all of the SQL required to compute features for each user, using the ID graph as a map of where each user’s data lives across the tables.
Even though our initial use case focused only on app signup status, we wanted to go ahead and include additional features that the marketing team would use to expand the experiment after the first test.
Similar to the ID graph, several of the features we needed already existed as the output of other Profiles projects. Again, Profiles made it incredibly easy to use that existing data by simply adding those feature tables as inputs in new project (inputs are defined in the inputs.yaml file).
The first input we added was from our core customer 360 project, which includes data computed at a user level. The second input we added was a feature table from the Profiles project run by our Customer Success team, which includes account-level details.
YAML
Once those inputs were defined, we wrote simple definitions in the profiles.yaml config to create the entity_vars (features) we wanted to push to Redis. Here’s a snippet of that code:
YAML
Finally, we added a feature view in the pb_project.yaml config file to group the features by anonymous_id to facilitate the API look up from the website frontend.
YAML
Here’s what the FEATURES_BY_ANON view looks like in Snowflake:

Step 3: make the profiles available in real-time, via API
The next step was enabling the Activation API, which was as simple as adding details from the Redis cache we set up and toggling on the API in our Profiles project settings in RudderStack.
Once the initial sync ran, our feature view was loaded to Redis and accessible via the Activation API endpoint. Notice the anonymous_id value in the hash.

Step 4: integrate the API into our front end to change the user experience
Our frontend team helped us write this part of the post, which details the process they used to access the API from our frontend (Vercel) and serve the last-mile personalized experience to our visitors. Here are the steps they followed:
Intercept server requests to make real-time possible
We wanted to retrieve the visitor's anonymousId as early in the request process as possible, which would allow for personalization-related cookies to be received by the client as a part of the initial request with little to no delay. To do this, we used Vercel’s middleware. Here are the steps:
1. Set up middleware
First, we set up middleware on the server to intercept incoming requests. If you’re using Vercel, it’s as easy as adding a middleware.ts file at the top level of your application.
If you’re unable to intercept requests on the server, you can still access the anonymousId on the client (see below).
2. Decrypt the anonymousId
Next, we utilized @rudderanalytics/analytics-js-cookies to get the anonymousId from the decrypted request cookie:
JAVASCRIPT
3. Make an async request to the Activation API
Now for the fun part. In this step, we made an asynchronous request to the Activation API using the anonymousId we decrypted earlier. The API is designed for real-time requests and will respond quickly with a JSON payload in the shape determined by your schema. A few tips here:
- Be sure to include your destinationId in the request. This can be found in the RudderStack app platform when setting up Profiles.
- Store your Bearer token in environmental variables and do not commit them to git history.
- If you’re using NextJS, be sure to enable the no-cache strategy so that no responses are cached and every request is fetched from the Activation API.
JAVASCRIPT
4. Set ResponseCookie(s) and return headers
Lastly, we set a ResponseCookie with the values required for personalization. For this use case, we wanted the boolean value for the USER_APP_SIGN_UP key.
JAVASCRIPT
Receive and utilize personalization ResponseCookie(s)...to do real-time personalization!
Once we added a new ResponseCookie to the headers, we were able to receive that on the frontend and use it to trigger the personalized experience. These were the steps:
1. Get the newly-set ResponseCookie
There are a few ways to tackle this. You may choose to access the cookie in the component where you will apply personalization, or you may choose to access it as early in your application hierarchy as possible and set a global state value that all other components can key off of. We utilized the universal-cookie library, but there are several other options to choose from.
Keep in mind that your cookie name needs to match the first argument used when firing responseCookies.set() in middleware (see above).
Here, we created a reusable function for getting the cookie:
JAVASCRIPT
2. Deliver a personalized experience based on the cookie value
Once we had access to the cookie from nearly anywhere in the frontend, we were free to apply personalization however we pleased.
Pro tip: If you’re using a framework like NextJS and you try to access the cookie via next/headers, be aware that cookies() is a Dynamic Function whose returned values cannot be known ahead of time. Using it in a layout or page will opt a route into dynamic rendering at request time.
Because the header of our application is rendered client-side, we opted to relegate cookie access to the client and keep as many statically generated routes as possible. Here’s the code that drives our basic personalization use case:
JAVASCRIPT
And here's the updated call-to-action:

Tracking experiment participation for each user
Our marketing team is rigorous about tracking every experiment, so we wanted to make sure we were capturing experiment participation as an input for their analytics (they use Mixpanel, but you could also use this data in tools like StatSig or Eppo).
We utilized RudderStack’s Javascript SDK (already running on the site) to send an identify() call with a trait that captured experiment participation. This is a bit of a unique use for the identify method in that it is normally used to create users and update user traits in the context of signups and logins. One characteristic of the method, though, is that traits declared in identify calls are automatically included in all other calls for that user moving forward. That means that if a user participates in an experiment, our marketing team can segment any downstream conversions on that flag, enabling full-funnel analysis for experiment members, both in analytics tools and in the warehouse.
Here’s how to fire the identify() call:
1. Utilize the onReady() callback function to fire off an identify() call as early as possible
Using @rudderstack/analytics-js, we created a rudderInitialize() function that was fired very early in the Javascript runtime. See our documentation for in-depth instructions and options.
We set an activation_api_experience key to denote experiment participation (we’ll create a more extensible taxonomy in the future 😂). See our identify documentation for details.
JAVASCRIPT
The nice thing for our marketing team is that they can use their existing reporting tool and simply segment reports using the activation_api_experience trait. Here’s a screenshot of what this looks like in Mixpanel (pardon the inconclusive data...this was taken right after the experiment launched):

Alternative implementation: doing everything client-side (almost)
While the best experience for end users is the process detailed above, you may not be able to intercept server requests via something like Vercel middleware. The good news is that you can still follow a similar process on the frontend, though there will be an inherent delay as the frontend will need to fire off a request to and await the response of the Activation API.
Here’s how we would implement this without middleware:
Utilize the onLoaded() option instead of onReady() callback property
The onLoaded() option is new as of v3 and will fire earlier than the onReady() function. Pass in an asynchronous function that fires your request, but…
…create a proxy endpoint to obfuscate your credentials
Because this request is coming from the frontend, users will be able to see what information is being sent. Creating a proxy endpoint on a server to which you only pass the anonymousId is the safest way to ensure sensitive credentials are protected. We still recommend that environmental variables be used and that no credentials are committed to git history.
NextJS allows for very simple creation of API endpoints. Here is an example which is very similar to a portion of the middleware code above:
JAVASCRIPT
Consider setting cookies on the frontend
While this isn’t necessary, setting a cookie on the frontend may allow you to bypass the inherent delay after the client has successfully fetched the Activation API.
Consider when that cookie should expire so that you can re-fetch the Activation API when appropriate.
(Note: Without middleware, you can fall back on onLoaded callback function for a minimal delay)
Start building your personalization engine today
If you’re interested in building a similar personalization stack, reach out to our team to get a personalized demo.
In the meantime, here are some case studies from customers who have seen significant results using RudderStack to drive personalization:
Published:
July 11, 2024

Data without compromise: The RudderStack story
Learn about how RudderStack started and how it has evolved into a best-in-class data infrastructure solution to help businesses move their customer data with full control and safety.


How RudderStack simplifies onboarding and elevates customer support
Migrating to a new customer data infrastructure tool can feel daunting, especially when dealing with complex customer data pipelines. That’s why RudderStack provides an onboarding experience designed to set your team up for success from the start.


Real-time vs. warehouse-gated: Finding the right balance for your customer data infrastructure
The future of customer data infrastructure isn't about choosing between warehouse-gated or real-time architectures—it's about intelligently combining both approaches to meet your business needs. Learn how to strike the right balance for your business


