Blog
Streaming Events From Salesforce for Lead Enrichment With RudderStack’s Webhook Source
Streaming Events From Salesforce for Lead Enrichment With RudderStack’s Webhook Source

Benji Walvoord
Director of Solutions Engineering
8 min read
September 23, 2021

In this post, we’ll walk you through RudderStack’s Webhook source, and how we’re using it for automation internally. We’re streaming new lead created events from Salesforce through Rudderstack for lead enrichment then back to Salesforce and other downstream tools like Customer.io and Snowflake.
For those not familiar with Webhooks, a Webhook source in RudderStack is like hanging a digital piece of flypaper that captures anything you throw at it as long as it’s encoded as JSON. Webhooks do not request information, they only receive it via HTTP requests from your website, application, apache service, etc. So, they’re best suited to process notifications and forward them to your downstream destinations and warehouses.
How we enrich new leads created in salesforce with Clearbit data
Like a lot of companies, we use Salesforce as a CRM. In fact, our Salesforce integration is one of our most popular destinations, but most people don’t typically use it as a source for streaming event data. We also use Clearbit for lead enrichment and have published a user transformation in our git library that we routinely call prior to sending new leads into Salesforce.
But we ran into a problem when we didn’t have enough data attached to a new lead to trigger a meaningful response from Clearbit. We needed a way to trigger Salesforce to re-fire the Clearbit Enrichment Transformation once sufficient information was collected on the lead record – a perfect use case for our Webhook source. Yes, we could have opted to purchase the more expensive version of Clearbit that already integrates with Salesforce, but in addition to the cost savings of using the API version, with RudderStack firing the transformation, we can send that enriched data immediately to all other downstream tools like Customer.io, custom audiences, and Mixpanel.
For this particular tutorial, we will call the Clearbit Lead Enrichment API for all leads created in Salesforce. We will create a new process builder to fire in Salesforce once a new lead is created and saved. The process builder will call a generic Salesforce Apex Class (that we will write) to pass whatever fields we want from our lead record to our RudderStack Webhook source as a JSON payload. We will create a user transformation similar to the one in our git library, but we will tweak it to support the needs of our Salesforce Destination.
If you would like to build this solution or learn more about how to set up something similar, check out our Webhook Source Documentation in our user guide and sign up for a free trial account if you haven’t already.
Step 1: Create a new Webhook source in your instance of RudderStack
Create a new Source and select the Webhook option under Event Streams in the RudderStack User Interface.
After you give it a name, you can find the specific URL for your webhook on the settings tab:
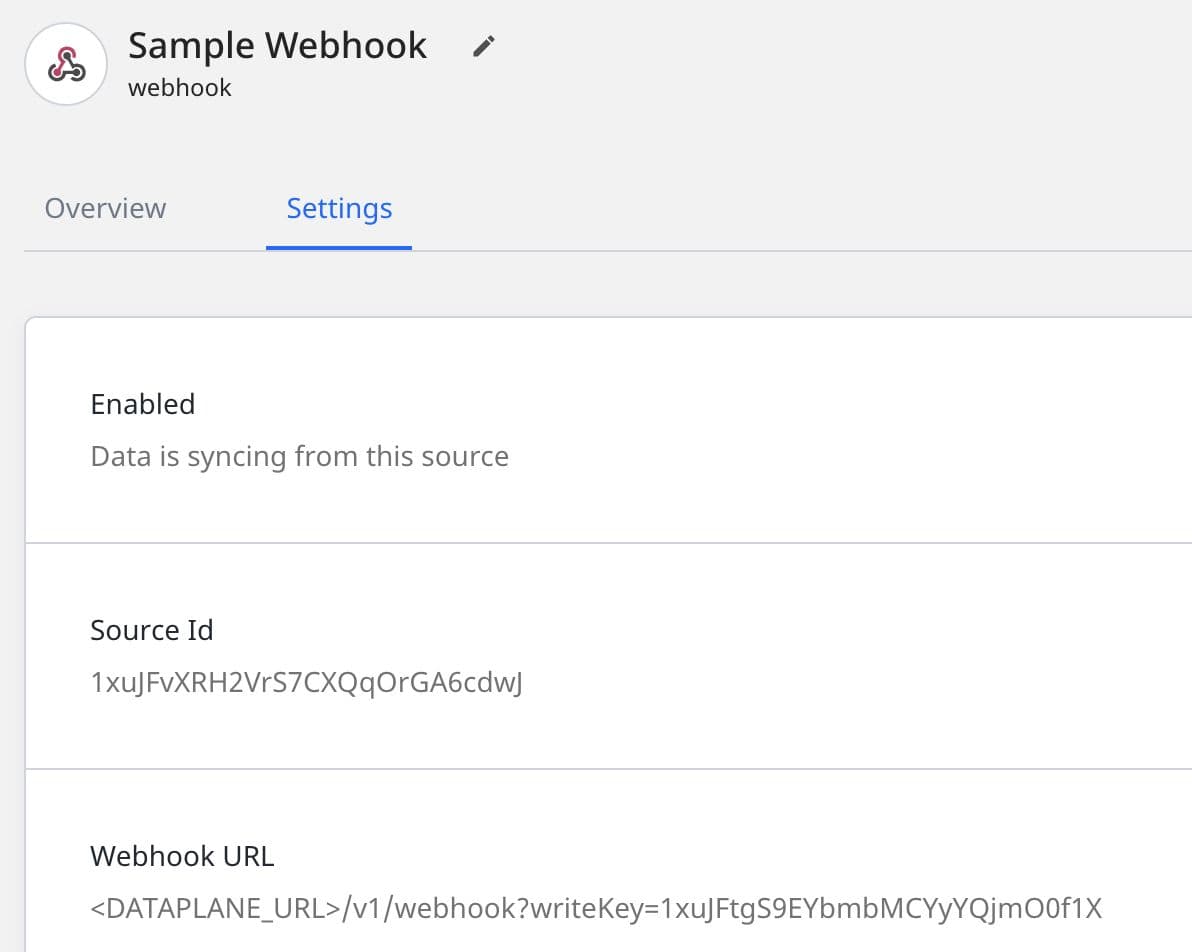
The Dataplane URL can be found on the top of your main Connections page.
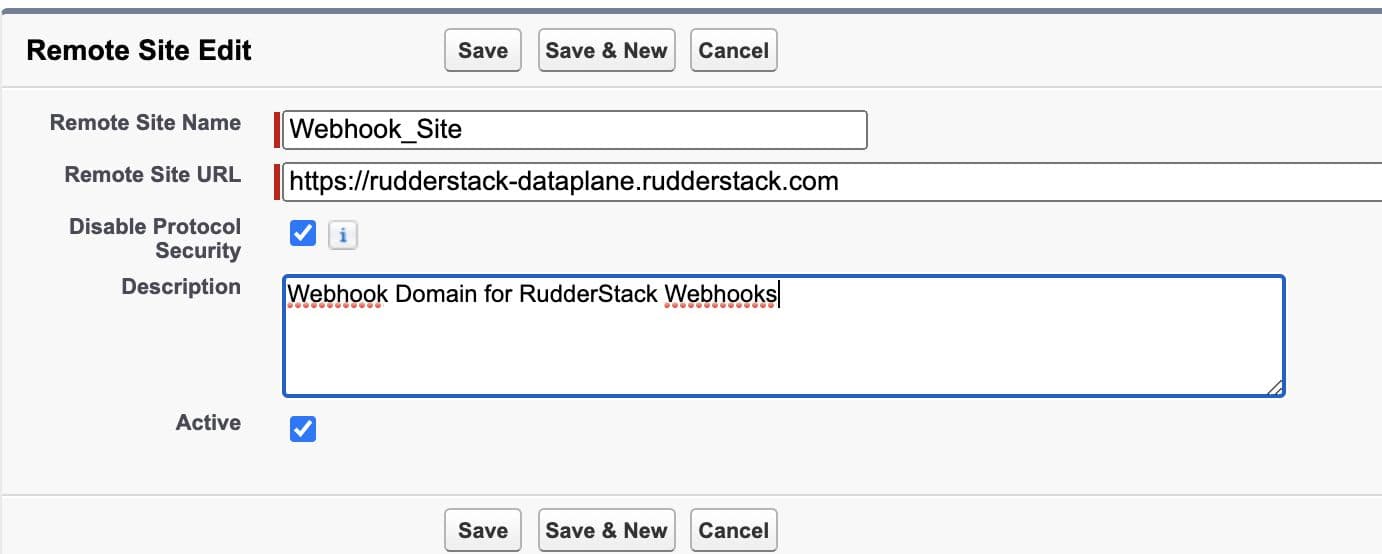
Step 2: Register the URL with Salesforce
Once you have the URL for your webhook, the next step is to add it to your list of Remote Sites in Salesforce. Without registering the URL as safe, Salesforce will block the outbound call.
From the Salesforce Setup menu, click Security Controls then Remote Site Settings. Enter the URL for your dataplane.
Note: You do not need to include the full URL of your webhook. Mark it as Active.
Step 3: Create an Apex Class
In our example, we will trigger the webhook from a process builder (you can also create a flow or trigger to do the same), and it will call a generic Apex Class to convert the data to a JSON payload and call the URL. We could do all of this in a single trigger, but this example creates a generic processing tool that can be called by any object via Process Builder where even the Webhook URL is passed in the Process Builder UI. This creates a “code it once” solution that, once deployed, can be used for multiple objects and RudderStack Webhook sources.
In the Developer Console, create a new Apex Class called SendToRudderStack.apxc
JAVA
You will also need a test class called SendToRudderStackText.apxc
JAVA
The Apex class creates a container that has five fields of data, the record ID and the URL of the webhook destination. These are generic and allow us to determine the object and the fields to be passed (and their actual labels) in the Process Builder itself. (See Next Step)
NOTE: Apex Classes can only be created in your sandbox environment. If you are not familiar with deploying packages from your sandbox to production, please check out this Salesforce support thread on the topic.
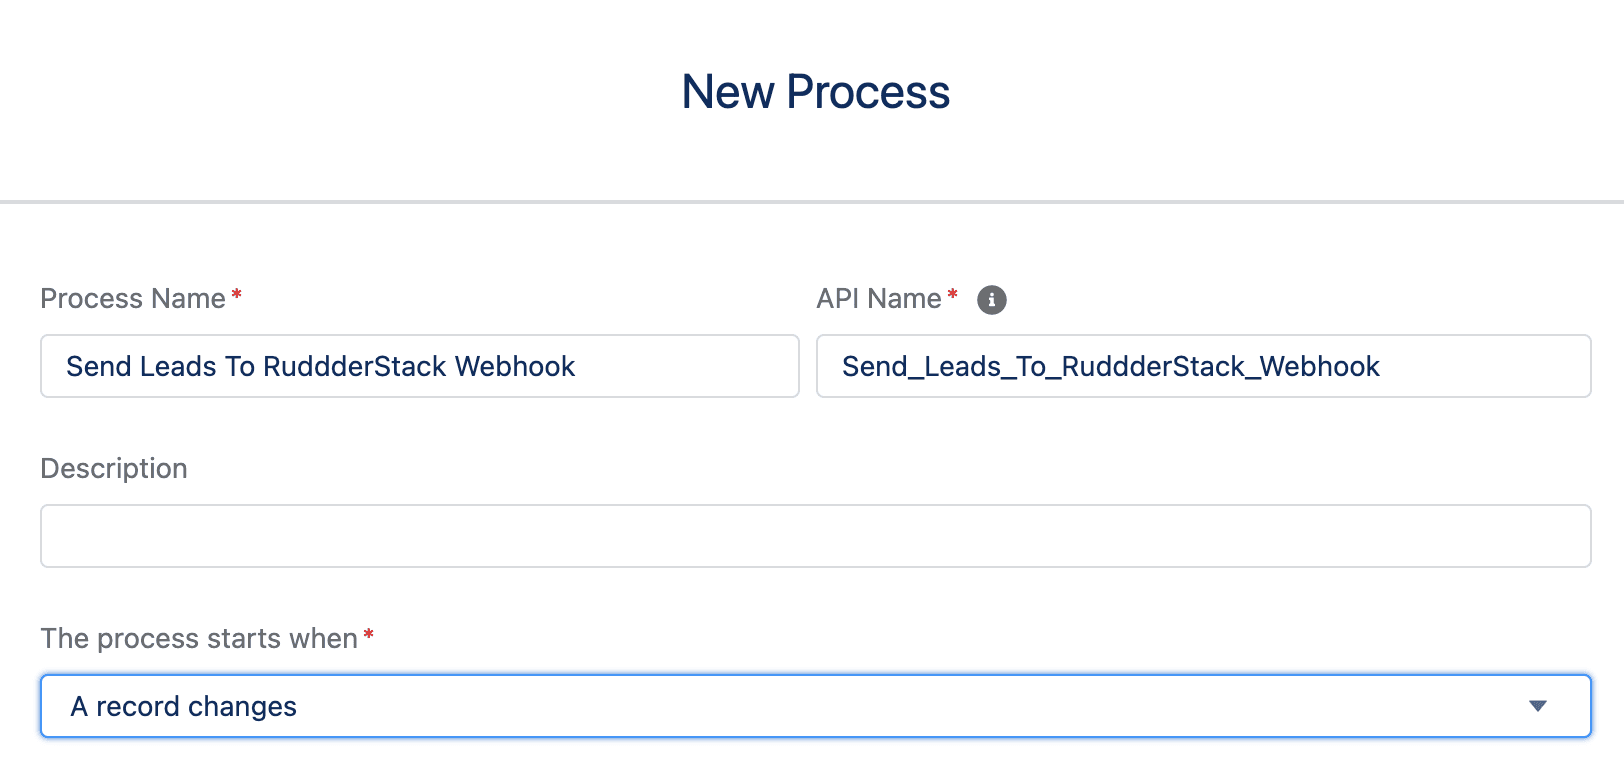
Step 4: Create the Process Builder
From the Salesforce Setup menu, type Process Builder in the Quick Find menu and click New to create a new one. In our example we want to send details of all newly created lead records back to RudderStack so we selected the Lead Object and chose to start the process when a record changes.

In the next step we define the criteria for which this action should fire. In our example we want all leads to fire once they’ve been created so we will not apply any filters and check the “No criteria - just execute the actions!” option.
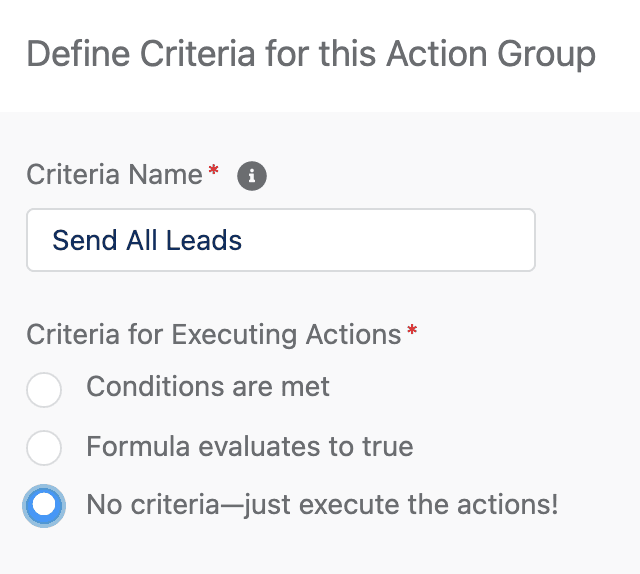
If we were firing the Clearbit API at some other point in the process, we might look to evaluate whether any of the clearbit fields were actually populated (or create a checkbox that would be set to true if the API was already called) and then apply logic to not fire the webhook in that event.
In the Immediate Actions menu, we want to select the “Call APEX” option and then find the Send Lead To RudderStack Webhook option. This name mirrors what we created in our Apex Class. If you don’t see this option, verify that your deployment of the inbound package was successful.
We then map the fields and field names as well as the Webhook URL for our RudderStack Source. As we noted above, the Apex class was designed to take any object or data passed through it. For this reason, we pass not only the Record ID, but a static string value that this object is a Lead. We also pass the URL for the webhook source, so, in the event we need to set up different sources in Rudderstack, we can re-use the same Apex class.

Save and Activate the Process Builder.
Step 5: Create the User Transformation to call Clearbit
In this example, we will be creating a new user transformation that will be applied to a new Salesforce Destination.
Note: In a more advanced setup, we could apply this transformation to an existing Salesforce destination and filter the transformation to only fire when the metadata tells us this event came from our particular webhook source. If there was already a user transformation applied to that destination, this could also be built as a library and only called if the metadata indicated the same event source.
User Transformation:
JAVA
Step 6: Create a new Salesforce Destination
Create a new Salesforce destination and connect it to the webhook. Add your newly created Clearbit User Transformation and now we’re ready to go.
Step 7: Create a lead - fire the Webhook!
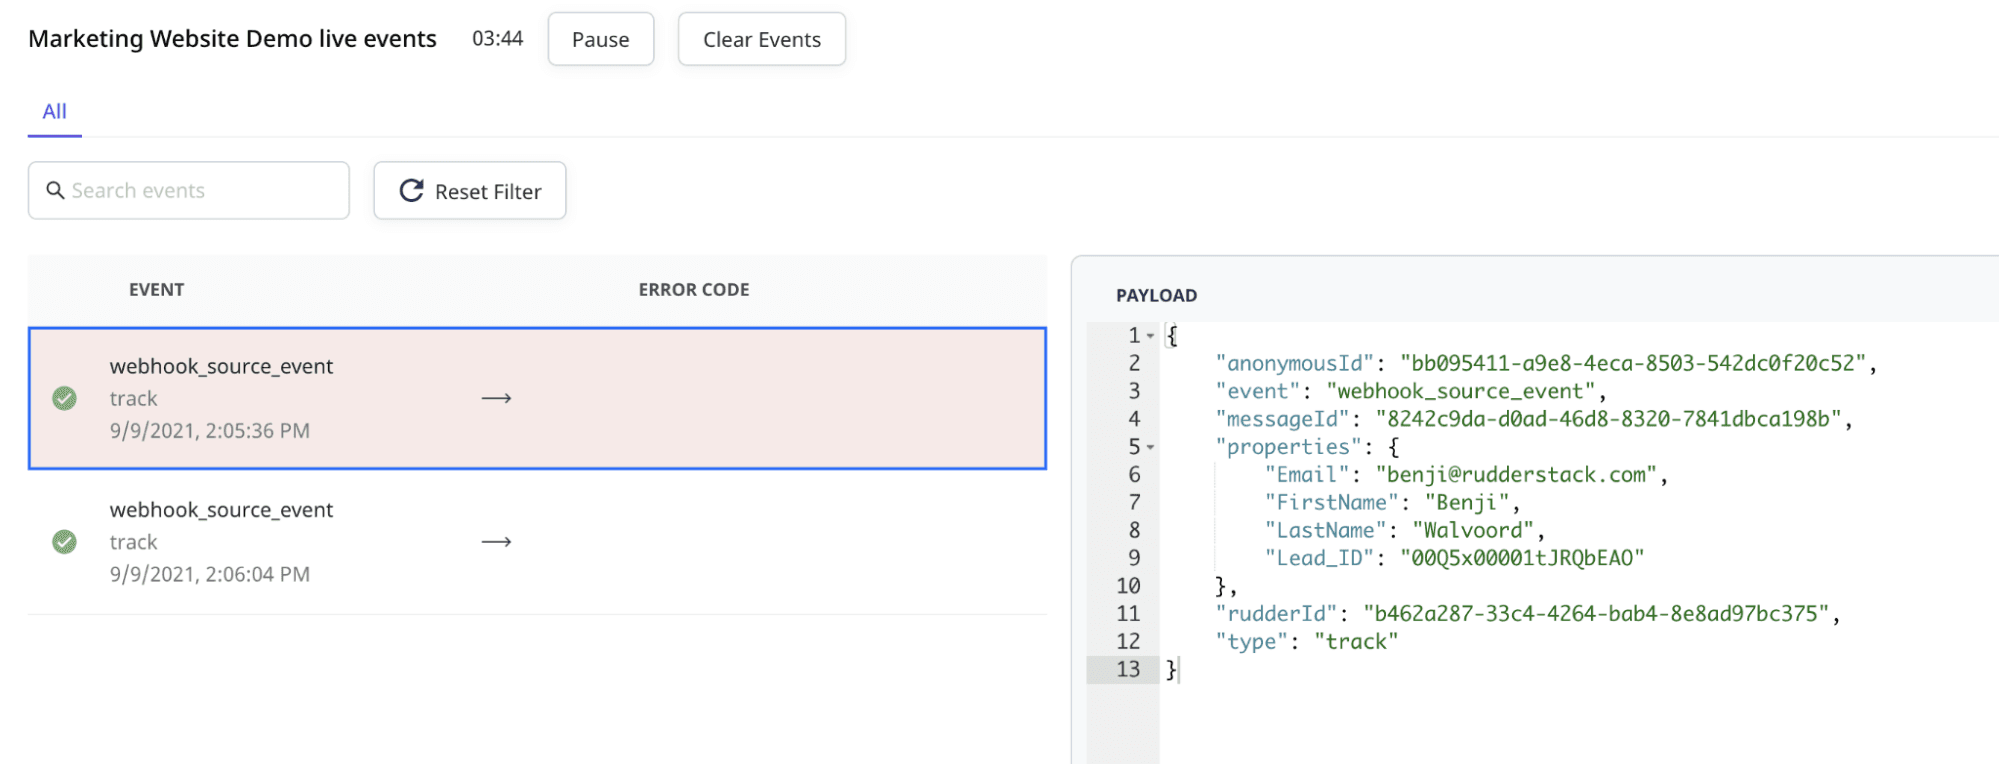
As soon as a lead is created in Salesforce, the process builder is fired and sends a message back to RudderStack. We can see the inbound event in the event viewer for the Webhook Source. For our test lead in Salesforce, we only had First Name, Last Name and Email address populated so those were the only properties sent.
The payload is then routed through the user transformation which calls the clearbit api. We can see the resulting JSON payload in the Salesforce Destination viewer as well as the resulting before and after screens from the lead in Salesforce.
JSON
Empty Clearbit fields:
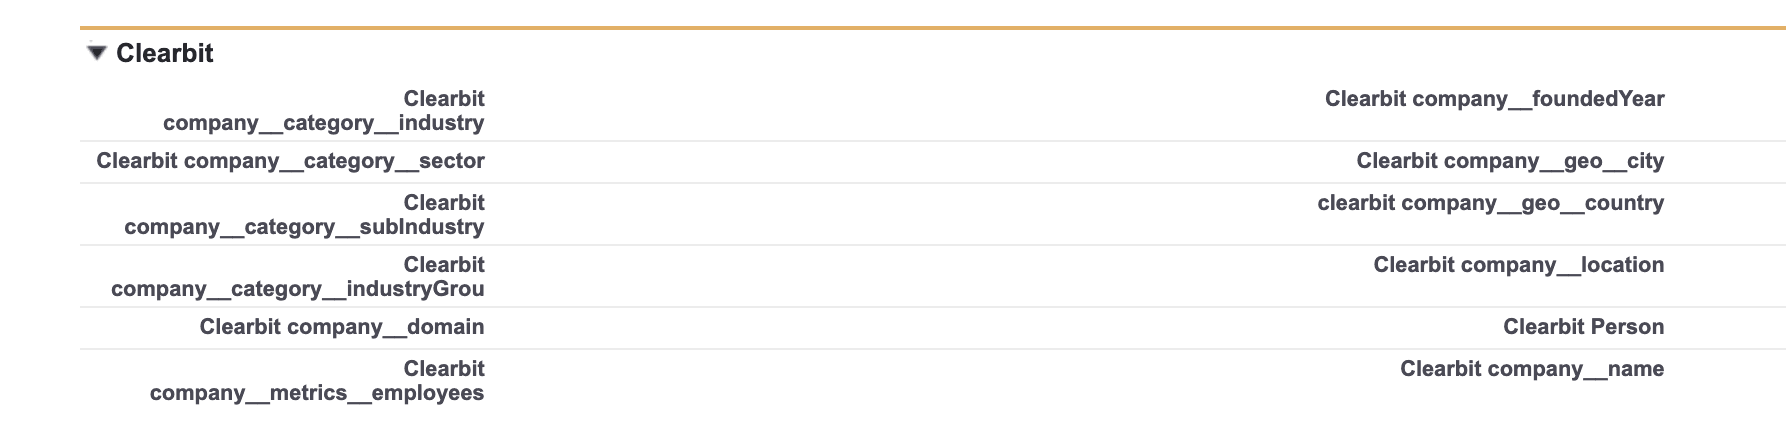
After Cleabit Update:

Now that you have a generic event handler, there are a million use cases for why you might want to stream events in real-time instead of a more traditional cloud-streaming option. At the top of the list are opt out notifications that need to be immediately broadcast to all of your other tools. You may also want to send closed opportunities to Slack or Microsoft Teams channels announcing a new deal. Please join us on Slack and let us know what Webhook Source uses you come up with!
Test drive the Webhook source today
Sign up for RudderStack to create your own Webhook source and begin sending data today.
Published:
September 23, 2021


Get started today
Start driving better business outcomes with your customer data in less than a week
Book a demo
Explore use cases with an expert and see RudderStack in action.
Implement RudderStack
Start collecting and enabling real-time customer data everywhere it's needed.
Drive better outcomes
Supercharge your analytics, product, growth, and AI teams.