Feeling stuck with Segment? Say 👋 to RudderStack.
Blogs
Implementing Tag Revalidation Caching using NextJS and Sanity
Written by
Chandler Van De Water
Senior Frontend Engineer
At the time I joined RudderStack, the marketing site was built on Gatsby. One of our main internal customers is the marketing team, with a considerable number of users creating, editing, and publishing varying types of content to the site. Now, a year and a half later, our current major priority is migrating rudderstack.com to Next.js. At this point, a large portion of the site has been incrementally migrated, unlocking potential cutting-edge features. One such feature we recently implemented is the new tag revalidation (or on-demand) caching strategy from Next.js. This new feature decreased our site build times, decreased requests to Sanity, our CMS, simplified our content editors' workflow, and significantly sped up release times. Cost ⬇️ + Efficiency ⬆️ = Business 📈
In this guide, I’ll provide the details of our implementation with a nitty gritty how-to. First, I’ll give a short overview of the project and the impact it’s had on our build times and workflow. Here’s a look at our web stack for context before we get started:
- Content Management System: Sanity
- Deployment and Hosting: Vercel
- Frameworks: Gatsby & Next.js
- Notable Dependencies: TypeScript, Material UI, Turborepo
Overview
Many websites use static site generators to create a fully-static HTML website from raw data and a set of templates. This method automates the coding of individual HTML pages and prepares them to be served to users before they are requested. There are several benefits to server-side rendering, namely speed and caching.
Other applications require more dynamic data (like the information only available to a logged-in user). In these cases, applications may generate pages at request time or push code to users' browsers that offloads the fetching of data and building of HTML. There are a few benefits to client-side rendering.
Next.js is a React framework for building full-stack web applications, offering both server-side and client-side rendering. For a marketing website like ours, rudderstack.com, we want as render as many pages on the server as possible. Next.js allows us to generate those pages during the build process.
The Next.js build process occurs frequently at RudderStack – whenever the development team pushes code to a branch in our GitHub repository, when website content editors from business teams manually trigger a deployment via the Sanity Studio, or when we deploy from the Vercel CLI. This process takes about 4-8 minutes to complete, delaying our content editors from immediately releasing changes to production. To enable a more efficient workflow, we wanted to drastically reduce these build times.
Production Releases: Before & After
Before we changed our caching strategy, our implementation of Next and Sanity required a deploy every time we wanted to release a content change to production because we wanted the speed of statically generated pages on the server. The flow was as follows:
- Make content edits – Sanity utilizes a "published" state to determine which content is production-ready
- Trigger Deploy – custom Sanity dashboard buttons allow our content team to trigger Vercel deploys
- Build Process – a 5-10 minute build process begins where data is fetched from Sanity and used to build out statically generated pages
- Production Release – at the end of a successful build, the deployment process automatically releases the build to production at rudderstack.com
This flow worked well, but releases could take longer than desired and would be delayed if there happened to be an error in the build process. With the tag revalidation caching strategy, our new flow follows this pattern:
- Make content edits – Sanity utilizes a "published" state to determine which content is production-ready. This now triggers a webhook that hits an endpoint on the Next app with the type of data that was changed (
tag
). - Tag Revalidation – the endpoint on the frontend fires off the new
revalidateTag()
function, causing the server to refetch any queries that are dependent on thetag
that was received from the Sanity webhook. - Server Re-render – any pages that were dependent on that newly fetched (revalidated) data are re-rendered on the server and served up on the next request.
This new flow significantly decreased both our total build times and total fetches to Sanity, saving us money. Perhaps more importantly, it simplified our content editor's workflow and sped up our release times, increasing our efficiency.
Implementation: On-demand revalidation with Next.js
The Next.js cache tagging system for invalidating
fetch
requests across routes is called "tag revalidation" or "on-demand revalidation". We implemented this cache tagging system by utilizing the Next.js revalidateTag() function and Sanity'snext-sanity
library (a wrapper around@sanity/client
that is fully compatible with Next's caching features). Within the Next/Vercel ecosystem,revalidateTag()
allows you to purge cached data on-demand for a specific cache tag.Utilizing this functionality gave us nearly-instantaneous deploy-less content updates.
Critical Dependencies
Please note that that a critical change for this functionality landed in next
next
@ 14.0.4 (App Router)next-sanity
@ 7.0.3sanity
@ 3.20.2
Server-side Rendering
If you're coming from the world of single-page applications (SPAs), you may be familiar with the concept of loading client-side Javascript that fetches data and utilizes libraries like React or Vue to render and display that content. And if you've been a developer for any amount of time, you know that nothing stays new for very long. In fact, you may have realized that the web works in cycles and we’re all in the process of getting back to our roots. In the past, everything was rendered on the server. Then, up until recently, we were rendering entirely too much on the client. Now, we’re attempting to tackle the best of both worlds: the speed of the server and the dynamic nature of the client. Enter React Server Components, or RSCs, which individually fetch data and render HTML entirely on the server, eliminating the need for client-side re-rendering, thereby improving performance.
React Server Components
One of the reasons we love Next is due to their opinionated, prolific use of RSCs. If you spin up a brand new Next app and include TypeScript, you'll get some wonderful tooling that helps alleviate some of the confusion around when, where, and how to implement RSCs. If you're unfamiliar with the flow and benefits of RSCs, Next has some great documentation on rendering environments and Vercel's blog post, "Understanding React Server Components" is a must-read. Josh W. Comeau has a great primer on RSCs, as well.
Front-end Implementation
Instrumenting
Before the introduction of the tag revalidation caching strategy,
next-sanity
utilized@sanity/client
to provide a fetching function that we wrapped inReact.cache()
.TSX
This gave us optimized and cached fetches but only within the React context, meaning that if an exact duplicate request was made, React would prevent the fetch to Sanity and utilize locally cached data. A welcome optimization, for sure, but unhelpful when the data has changed since the initial request response was cached.
With the advent of tags, we were able to remove
React.cache()
from theclient.tsx
and import it into a newclientFetch()
function that passestags
through as options in the fetch request. Other fetch options are available but be aware that they may cause conflicts when used in tandem.TSX
This new function also receives a return type (
QueryResponse
) that keeps our async functions clean and tidy. You'll also notice some references toisDraftMode
above. Next.js provides the ability to switch to dynamic rendering (rendered at request time instead of build time) vianext/headers:draftMode()
, allowing us to fetch draft content instead of published content. We enable/disable draftMode via Next Route Handlers. Sanity has Next.js-specific documentation if you are interested in that functionality.Fetching
Now that our new tag-revalidated fetching functionality is available, we can pass an array of
tags
through with each request, allowing Next.js to associate multiple requests with particulartags
. Under the hood, Next.js extends the nativefetch
Web API to allow you to configure the caching and revalidating behavior (tags
) for each fetch request on the server. Thesetags
can be an array of simple strings but in our case – using Sanity –tags
are synonymous with documenttypes
(represented within the Sanity schema as_type
). This will make more sense in the API Route Handler and Sanity Webhook sections below.Sanity utilizes a custom query language called GROQ which is very powerful but has a bit of a learning curve. To fetch the necessary data to render rudderstack.com/learn, our
groq
query is as follows:TSX
Without worrying too much about the syntax or the mixing of snake- and camel-case, you can see that two types of documents are being fetched:
learning_center
andlearningCenterCategories
.When we use this query, we ensure that those document types are passed as
tags
:TSX
Now, whenever the
learning_center
orlearningCenterCategories
tag is revalidated, Next.js will clear the cached data, refetch the query above from Sanity, and cache that newly-fetched data — all on the server and all without requiring a new build.API Route Handler
So, how do we revalidate those
tags
we passed toclientFetch()
for fetching the data to render/learn
? In order to fire offrevalidateTag
, we need to set up an API route in our Next.js app that handles an incoming request, in this case, made by a GROQ-Powered Webhook.TSX
First, we use
next-sanity/webhook:parseBody()
to validate that the request came from an approved source. This is done by passing inprocess.env.SANITY_REVALIDATE_SECRET
, a string generated by Sanity's webhook interface. We’ll get there shortly.If the request includes a
_type
, we pass it intorevalidateTag()
(remember, these represent documenttypes
within Sanity andtags
within the frontend).Upon successful revalidation, we return a
200
with arevalidated
boolean, a timestamp, and thebody
of the request. Sanity logs these attempts and responses in their webhooks interface.At this point, you'll need to deploy your next app to Vercel in order to expose your API endpoint publicly. It won't work until you create your Sanity webhook, generate a Secret, and add it to the Environmental Variables in your Vercel project and copy the deployment URL.
Sanity Webhook
Head over to Sanity's project management tool (not the Studio) to create the webhook that will ping the revalidate endpoint when any document is published. The URL for your Sanity project management tool should follow this format, where the
organizationId
andprojectId
are specific to your account:https://www.sanity.io/organizations/[organizationId]/project/[projectId]
Once you're in, click the API tab and the button to create a new webhook. Paste the deployment URL you copied from the API Route Handler step above, appending
/api/revalidate
to the end. Set the following values:- Dataset –
development
, assuming you have a dataset that can be tested against - Trigger On – check all 3: create, update, and delete
- Filter – leave this blank unless there are only particular types of documents that you want to revalidate
- Projection – add "
{ _type }
" - Status – check this and enable the webhook
- HTTP Method –
POST
- HTTP Headers – leave blank
- API Version – the latest here should be fine but ensure that it aligns with what you have set in your Sanity project
- Drafts – leave unchecked
At the bottom of the list, generate a Secret and copy the value. Save your new webhook and return to the webhook listing page. To the right of your newly-created webhook, you'll see 2 buttons, one to expose more options. Click it and select "Show attempt log", opening a new tab with the attempt log.
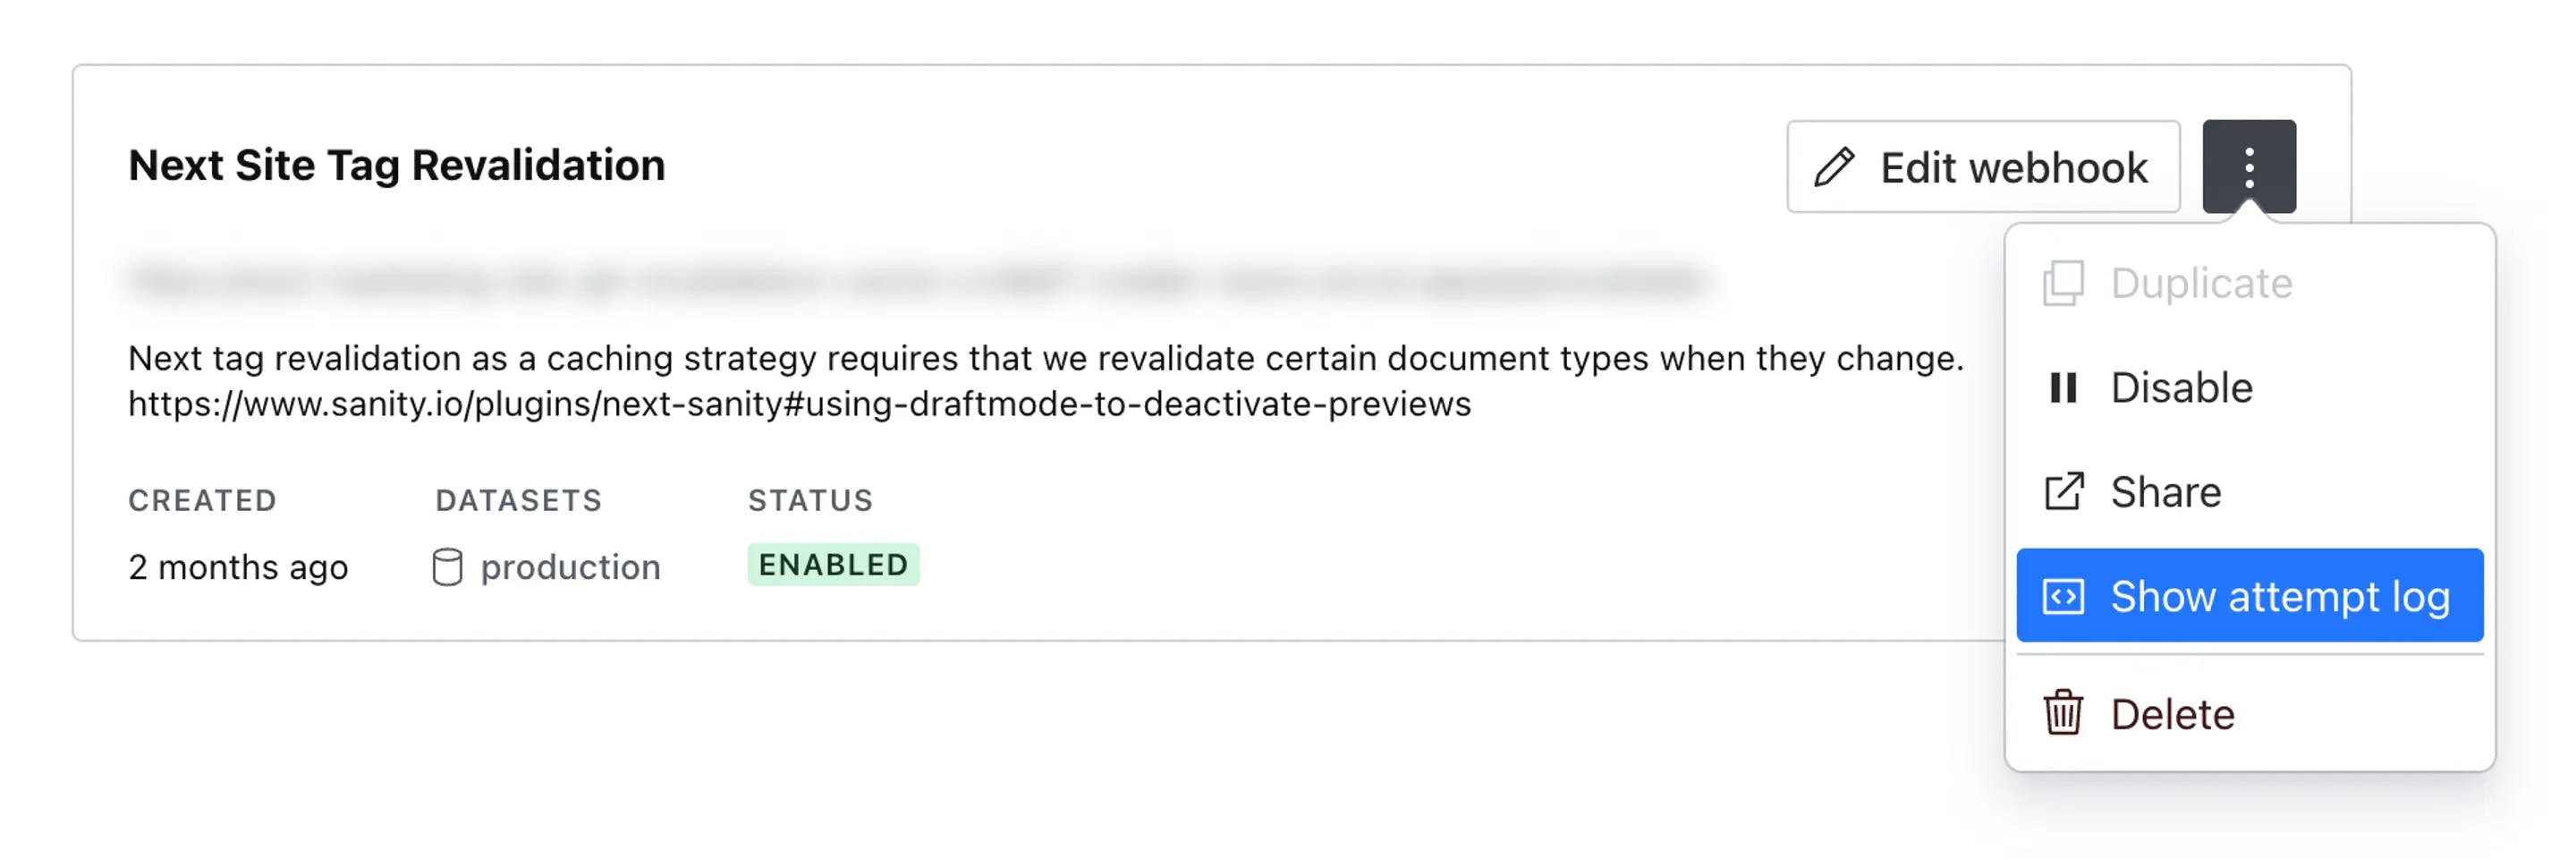
Sanity's Webhook Options
Head back to Vercel and open your Next project. Click the "Settings" tab, then "Environmental Variables" on the left sidebar. Create a new ENV VAR called
SANITY_REVALIDATE_SECRET
and paste in your Secret generated by the Sanity webhook interface.Testing
At this point, you should be able to publish a document change in Sanity, and, after a few moments, see that the deployment URL that corresponds to that change (in our example above, we would append
/learn
to the end of our deployment URL). Voila! Deploy-less content updates!If you're having issues, check the attempts log you opened earlier. You can also open up the logs for your Vercel project and expand the "Functions" filter in the sidebar, selecting your new
api/revalidate
endpoint and using the error messages there to help you track down issues.Once you're ready to go to production, be sure to change your webhook Dataset to production.
Recent Posts

Implementing Tag Revalidation Caching using NextJS and Sanity
By Chandler Van De Water

How We Optimized RudderStack’s Identity Resolution Algorithm for Performance
By Justin Driemeyer

The State of Data Engineering 2023: Reality Check
By Soumyadeb Mitra, Eric Dodds
Get the newsletter
Subscribe to get our latest insights and product updates delivered to your inbox once a month